Web Form Subscriber Managment
One common way to manage subscribers is through the use of a web form. When subscribing, the form can be set up to collect additional user data, such as first name, zip code, and more. On the other hand, the form can be used to allow a subscribed user to unsubscribe from receiving marketing messages.
In this guide, we’ll give you an example of each scenario. Both scenarios assume you have double opt-in set up.
Subscribe via Web Form
Suppose you’d like to use a web form to opt a new customer into a subscription list. To do so, you’ll need to ensure that when the user submits the form, they are added to an acquisition campaign. From there, they’ll go through the welcome flow for your campaign.
In this scenario, we’ll be using the add a participant API method.
Step 1: Set up your web form
The first step in this process is to make a working web form. If you have a way to do so outside of Vibes, you can do so, but if not, we recommend reaching out to your account representative for help from our Customer Success experts.
Be sure to set it up to collect all the data you’d like to include in the person record. See our Person API documentation for more details.
Custom fieldsYou can collect any data you want with the use of custom fields. If you don’t already have custom fields set up and would like to utilize this feature, we recommend reaching out to your Vibes Account Manager before you continue.
Step 2: Send API call
When the web form is set up, the next step is for your system to send an API call with the data to Vibes’ Acquisition Campaign API via the add a participant method.
For reference, this is the path the call should be sent to:
POST /companies/:company_key/campaigns/acquisition/:acquisition_id/participantsAnd here is an example of a possible request body. Remember, if you are using Version 2 of the APIs, the mobile number must use the E.164 format.
API Version 1
{
   "external_person_id":"EXT542342",
   "mobile_phone":{
      "mdn":"2995551234"
   },
   "custom_fields":{
      "first_name":"John",
      "last_name":"Doe"
   }
}
API Version 2 (E.164 MDN Format)
{
   "external_person_id":"EXT542342",
   "mobile_phone":{
      "mdn":"+12995551234"
   },
   "custom_fields":{
      "first_name":"John",
      "last_name":"Doe"
   }
}
Step 3: Verify call with return
If your web form worked as expected, you should receive a response from Vibes’ API. For example, here are two sample returns. One is a 201, indicating success, and the other is 422, indicating a failure.
/*EXAMPLE 1*/
SUCCESS: 201
{
   "person":{
      "external_person_id":"EXT532342",
      "person_id":"AB3423",
      "url":"/companies/:company_id/mobiledb/persons/AB3423"
   },
   "participation_date":"",
   "expire_date":"2017-01-16T14:30Z",
   "status":"PENDING"
}

/*EXAMPLE 2*/
FAILURE (invalid carrier): 422
{"errors":[{"message":"PersonErrors::MdnChangeNotAllowed"}]}
Step 4: Show confirmation or error message to the customer
With the status code received, your system should now be able to inform the customer of the successful subscription or any errors that might’ve occurred.
Errors do not always mean that the call was unsuccessful; for example, an error will be returned if an MDN is already subscribed to your list.
Repeat subscribers: If a person is already subscribed to your subscription list, you will receive a 409 error, and the record will not be updated with any additional information. If you’d like to update the record with new information, such as a zip code or name, you will have to separately set your system to send an update person API call to add the additional information to their record.
The graphic below is a visual representation of a few different screens that a user could see, depending on how the response returned by Vibes.
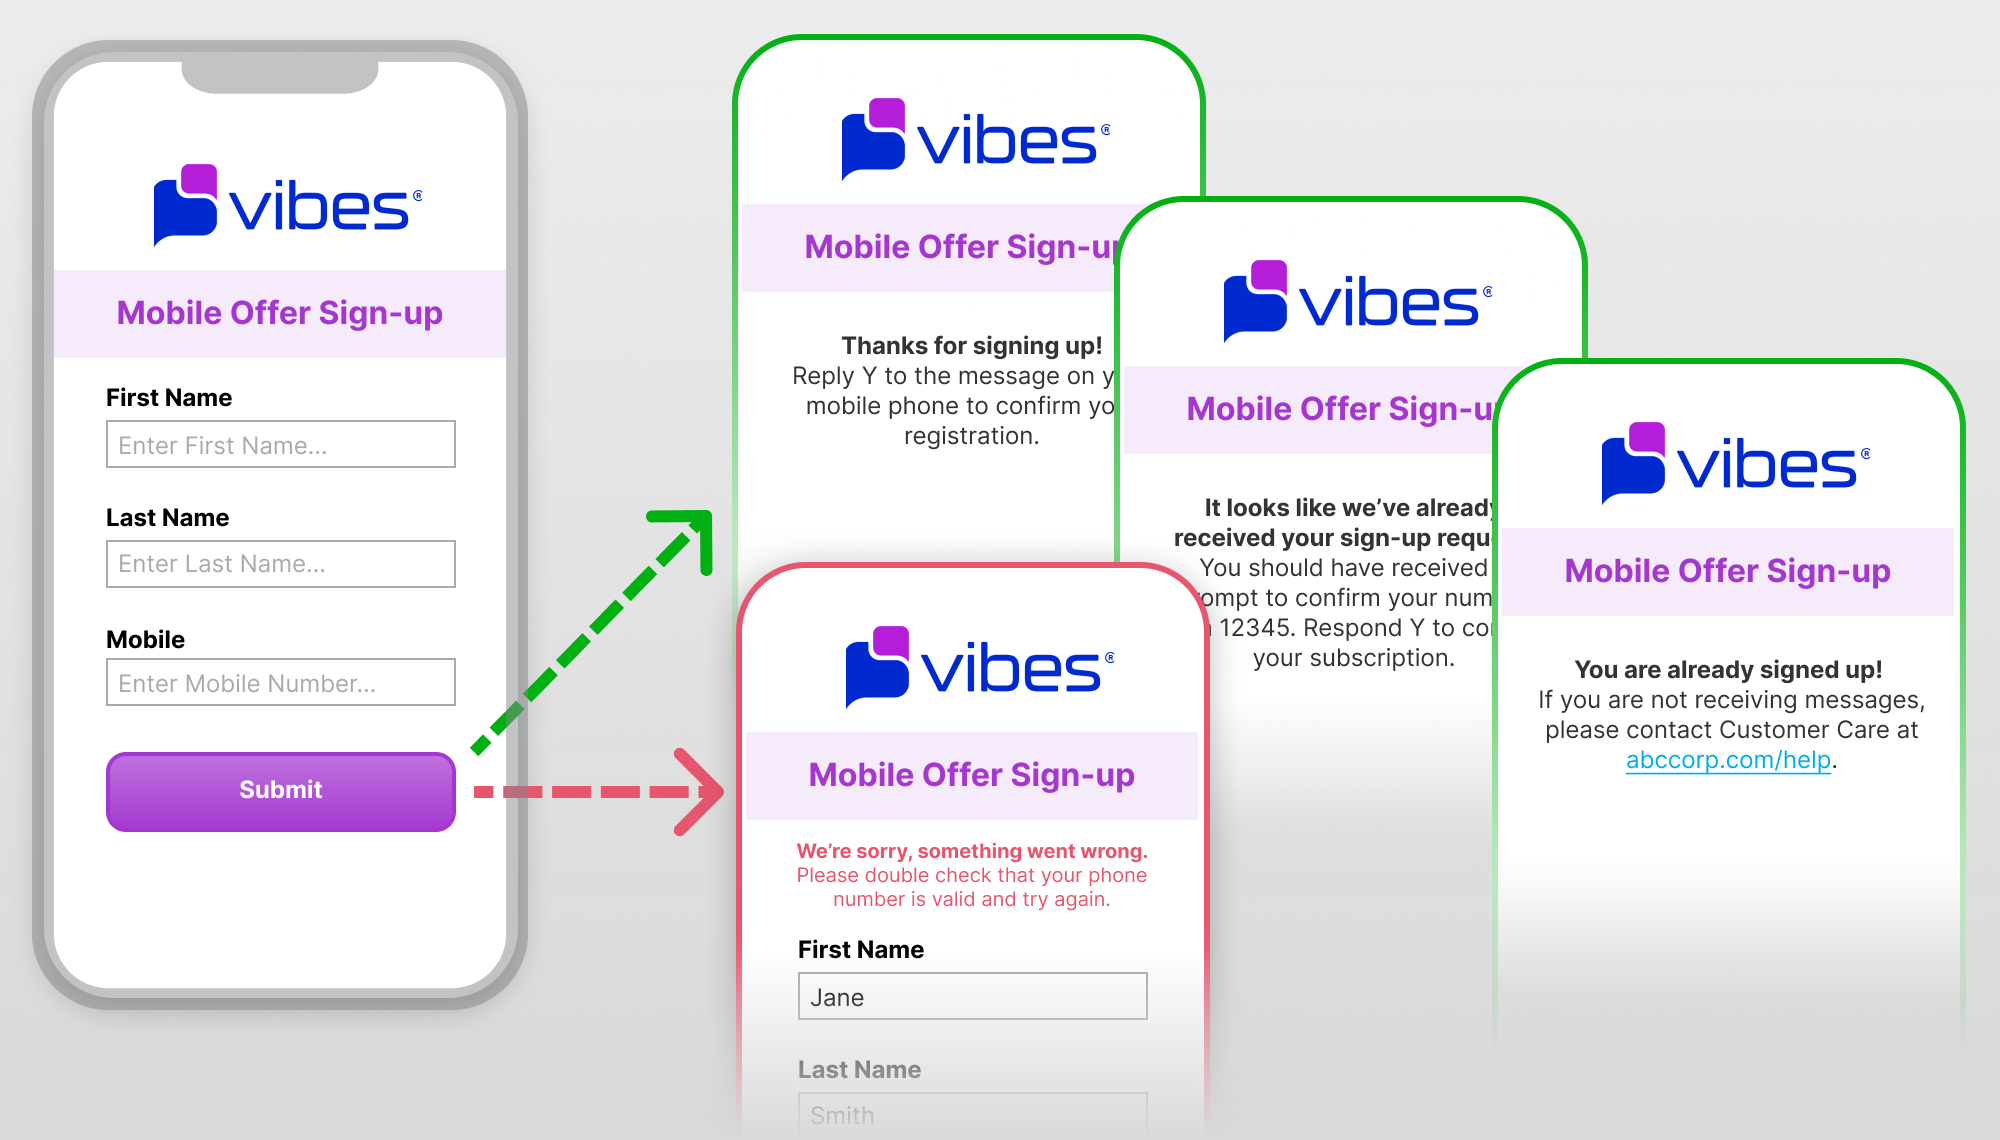
| Code | Code Description | Sample Web Form Message |
|---|---|---|
| 201 | Success. A message has been sent to the user prompting them to opt-in. | Thanks for signing up! Reply Y to the message on your phone to confirm your registration. |
| 200 | This code is sent if a person was previously added to the acquisition campaign, but did not complete the second step of double opt-in. | It looks like we’ve already received your sign-up request. You should have received a prompt to confirm your number from 12345. Respond Y to confirm your subscription. |
| 409 | This code is sent if the MDN is already subscribed to your list.
| You are already signed up! If you are not receiving messages, please contact Customer Care at abccorp.com/help. |
| 404, 402, or other error | An error has occurred, meaning this person has not been added to the acquisition campaign. This could be due to an invalid phone number or a system error; read about errors in detail here. | We’re sorry - something went wrong. Please double check that your phone number is valid and try again. |
Unsubscribe via Web Form
To allow your customers to unsubscribe from your subscription list using a web form, you’ll follow much the same steps as above. However, instead of using the Acquisition Campaign API, we’ll be using the Subscription API to remove a subscriber.
In this scenario, we’ll be using the unsubscribe person API method.
NoteIf you want to see all of the current subscriptions for a person to decide which ones to opt the customer out of, you can use the get all subscription lists method to show their current subscriptions.
Step 1: Set up your web form
Just like with subscribing, your first step is to create a web form that allows a user to unsubscribe from a list. If you need help hosting or maintaining a web form, reach out to your account representatives to learn about options provided by Vibes.
In this scenario, you’ll only want to collect enough data to identify the user and match them to either their person_key, person_id, or their external_person_id.
Step 2: Send API call
When the web form is completed and submitted by the customer, the next step is for your system to send an API call requesting that the subscriber be removed from the subscription list. To do so, you’ll need the individual’s person_id or external_person id, like in the example below.
Using Vibes Person ID
DELETE  /companies/{company_key}/mobiledb/persons/{person_id}/subscriptions/{subscription_list_id}

Using customer external ID
DELETE  /companies/{company_key}/mobiledb/persons/external/{external_person_id}/subscriptions/{subscription_list_id}
Step 3: The Vibes response is returned
After the call is sent, the Vibes API will respond indicating whether the removal was a success or failure. Here are two examples below.
SUCCESS: 200
no body returned

FAILURE: 404
no body returned
Step 4: Show confirmation or error message to customer
With the status code received, your system should now be able to inform the customer whether or not the unsubscribe was successful.
Below is a table with some sample responses depending on the returned code.
| Code | Code Description | Sample Web Form Message |
|---|---|---|
| 200 | Success – Person was unsubscribed from the list. | Thanks – you’ve been unsubscribed from ABC Corp texts. Made a mistake? If you’d like to resubscribe, please go here. |
| 404 | Invalid number – The entered number is not valid. This could be a user error or an error with your API call; alert your operations team of this error. | We’re sorry - something went wrong. Please double check that your phone number is valid and try again. |
Updated over 1 year ago