Collecting Data with Mobile Pages
In addition to wallet passes, you can use the Wallet Manager to create mobile pages that can be sent out via SmartLink.
When used in the context of a Wallet Campaign, this page can be used as a fallback for users who click on the SmartLink while not on a wallet-enabled mobile device. However, you can also use these pages to collect data to add to your customer database.
How Does It Work?
Just like a wallet pass, mobile pages can be sent out via SmartLink. The SmartLink contains a unique identifier in the URL, which identifies the person who has received the link.
When sending these URLs via an SMS campaign, the platform will automatically take the consumer's person_key value and append it to the mobile page URL. This is also true for wallet campaigns that include a mobile page either as a fallback or as a pre-pass page.
In the below example, the "unique_identifier" is the person_key. Note that this comes after the "?"; this formatting is crucial if you are connecting to your Vibes mobile database.

Personalization optionsSince each URL is unique to the individual, you can also personalize the experience for each customer. More on this later in the guide.
Adding Form Fields
Custom fields allow you to store information about your customers, making them a powerful tool for targeting broadcasts, customizing messages, and more. You can collect this information using a form created on a mobile page.
Step 1: Pick the custom field
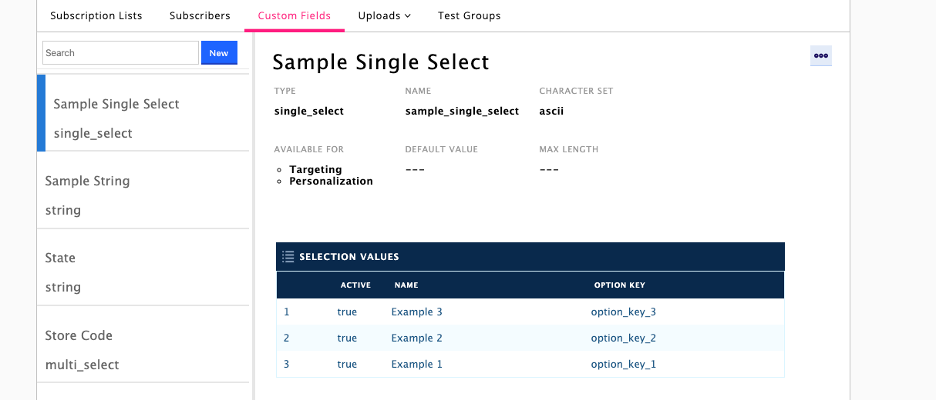
To start, you’ll need to make sure that you have a custom field to collect the data you’d like to store. For example, if you are a pet store who would like to know if your customer has a dog or a cat, you may need to create a custom field called pet_type.
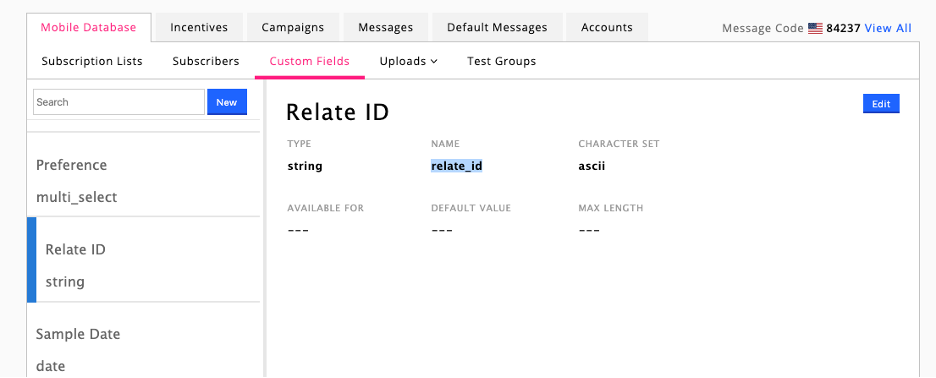
If you don’t already have a custom field set up, you can create a new one. If you already have set up a custom field, select it and find the “Name”, as shown below.
Step 2: Add a form field
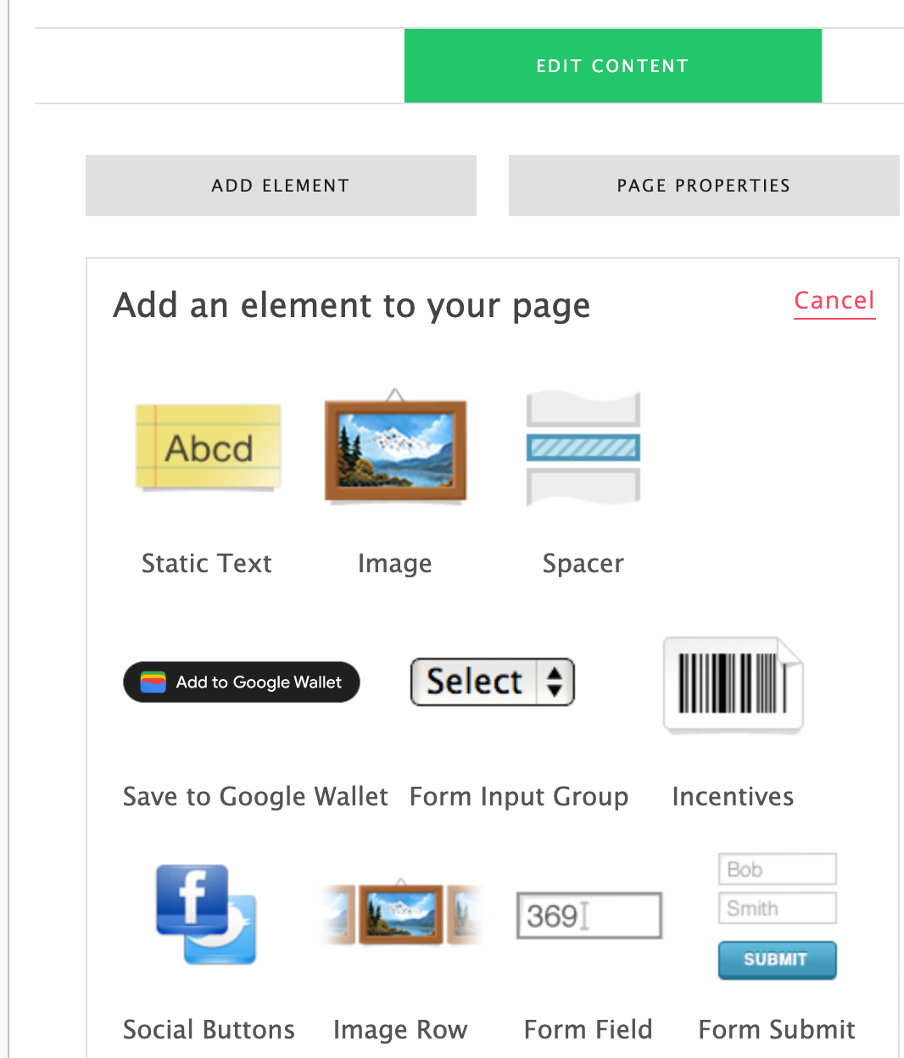
When you’re in the mobile page editor, you can add content to your page by selecting “Add Element.” Once you do, you’ll see a selection of elements that can be added to your mobile page. Select Form Field.
Step 3: Configure form field
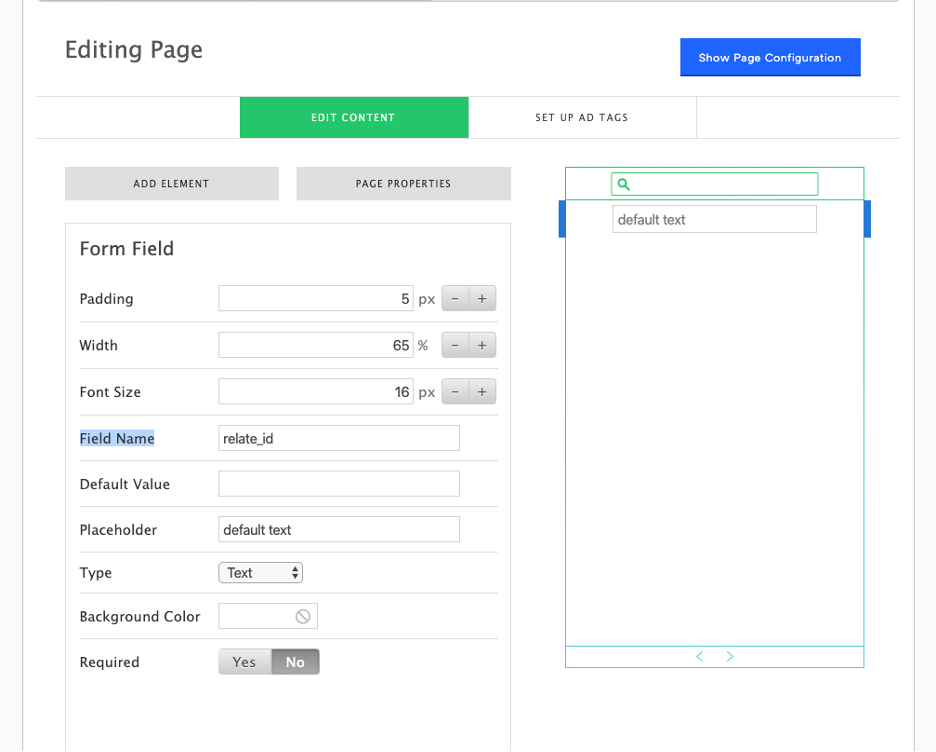
Now that the field is added to the page, the last step is to configure the field so that the system knows which custom field it should map the data to. To do so, you’ll add the name of the custom field to the “Field Name” field.
Notice that the field name doesn’t require any additional formatting for the system to recognize it. See the screenshot below for reference. Note that we use the field name (“relate_id”), not just the display name (Relate ID).
You can also set the default value and any placeholder text. Learn more about these fields below:
- Default Value: This setting is optional, and if used will populate the field display with a default value, which will be sent to the mobile database if the form is submitted.
- Placeholder: If this setting is used, it will output copy in the form entry field as light grey text. This value will not be sent to mobile database if the form is submitted. This option should be used to provide context on what kind of value you are trying to capture from the consumer.
Adding a Form Input Group
For some fields, you might want to give users a list of options to choose from rather than simply giving them an open text field. For these fields, you can use liquid template language to insert your options. The basic format is:
{{ mdb.field_name_here }}
Step 1: Pick the custom field
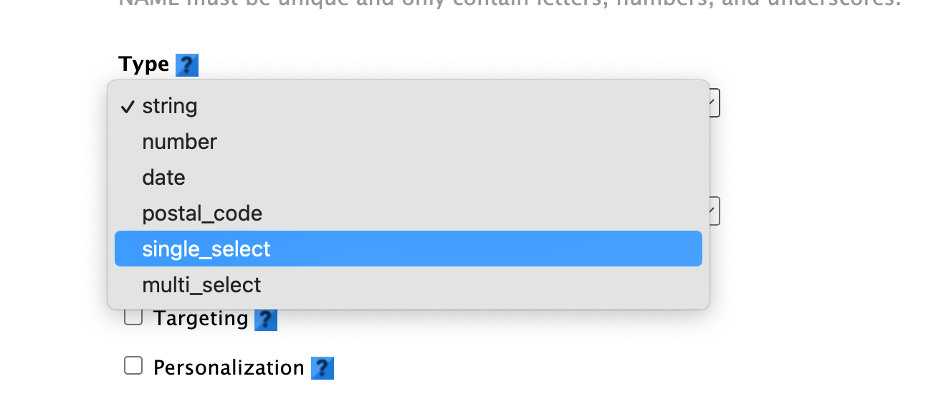
Just like with a form input, you’ll need first to create a corresponding custom field. When this custom field was created, the type should be either “single_select” or “multi_select”.
Single select will only allow one of the options to be added to the customer’s data, whereas multi_select allows more than one data piece to be collected. During creation, you’ll also define the values that can be selected.
Step 2: Add a form input group
When you are building your mobile page, select “Add Element” and then choose “Form Input Group.” You will get a page such as below:
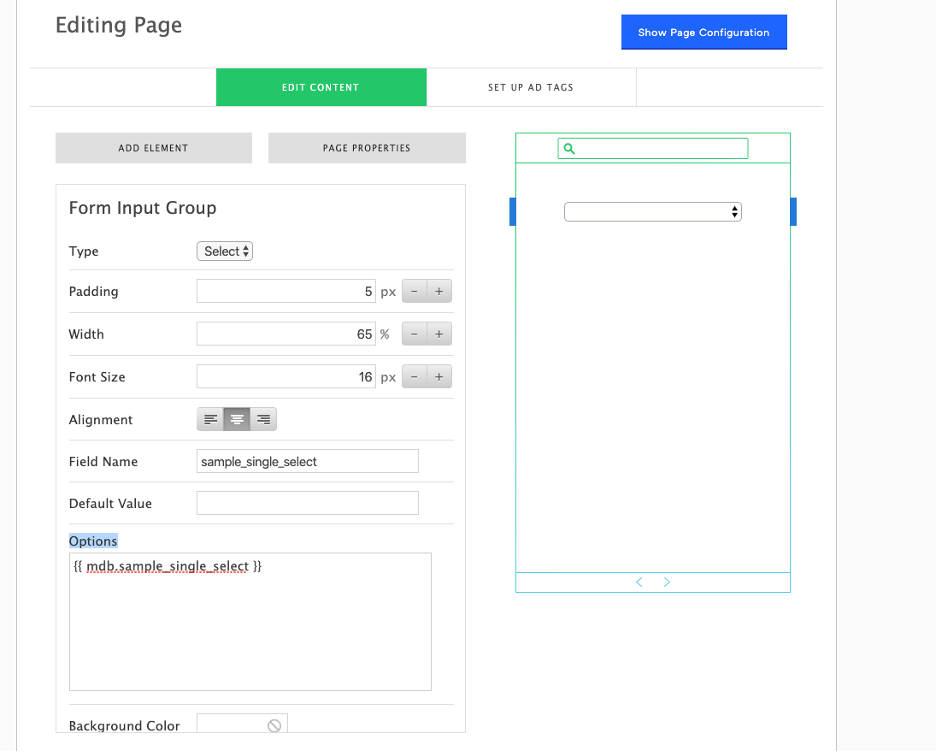
Just like with the form field, the Field Name field is where you will want to add the name of the custom field you are mapping to. Remember that this name does not need additional formatting and should be formatted exactly as the field name.
Step 3: Add options
The final step is to let the Form Input Group know which options should be displayed for a user to select from. To do so, we will need to use a tag that references the custom field you have already created.
In the “Options” box, add a tag that is formatted as such:
{{ mdb.FIELD_NAME }}
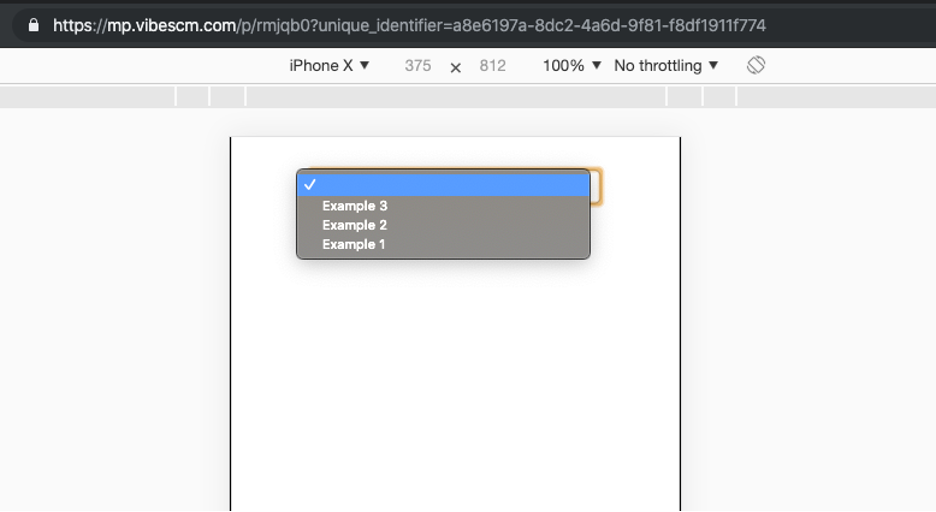
If configured correctly, the field will render something like the below:
Personalizing Mobile Pages
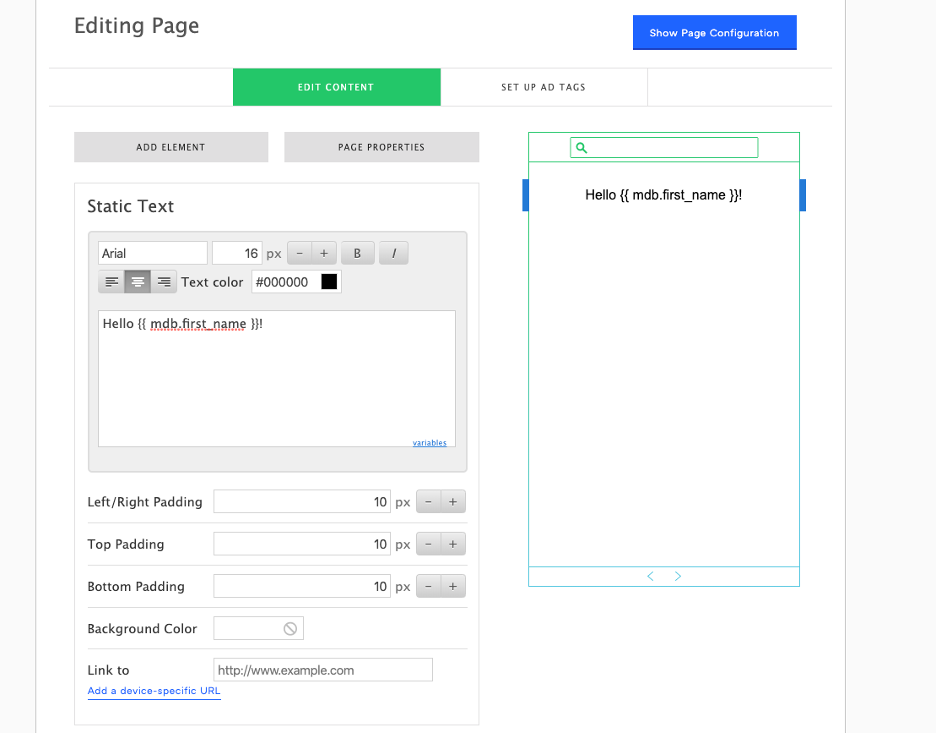
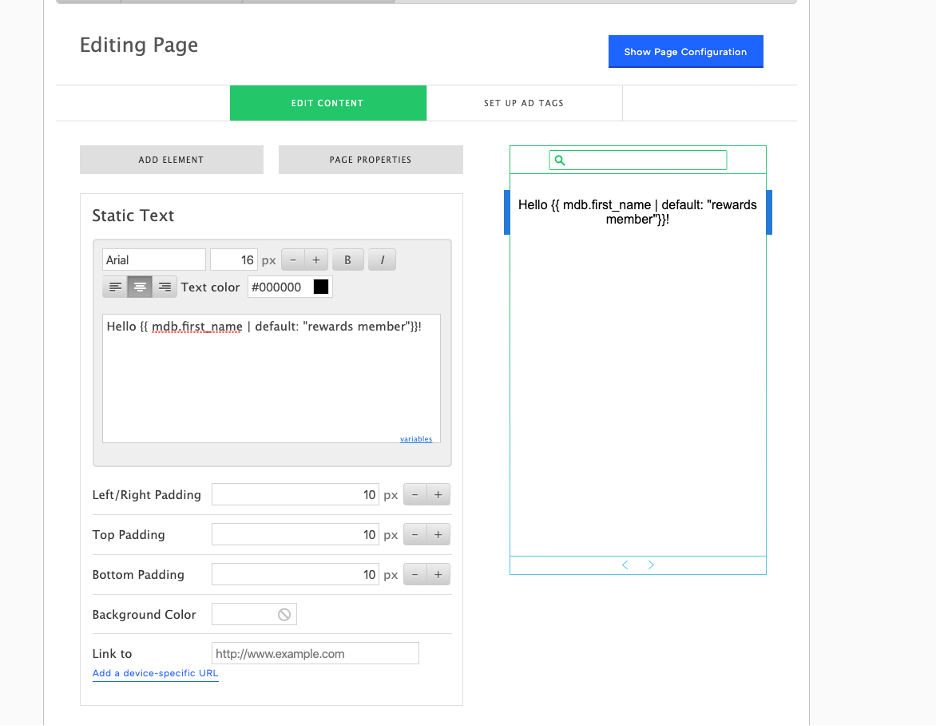
In addition to collecting custom fields, you can also use these fields to personalize your customer’s experience. For example, say you want to greet your customer by name. You can do so by placing their first_name field in a static text element.
To do so, you will use tags that reference the mobile database data. The basic format is:
{{ mdb.field_name_here }}
The "mdb." will tell our system to pull the value stored in the Mobile Database for this particular user. See an example of using a first name field below:
Mobile pages utilize liquid filter manipulation and liquid tags, more information on which can be found in Shopify's liquid template language documentation. In the example below, we use a liquid filter to provide a default value in case the consumer doesn't have a value populated in the mobile database:
Sending Data to the Database
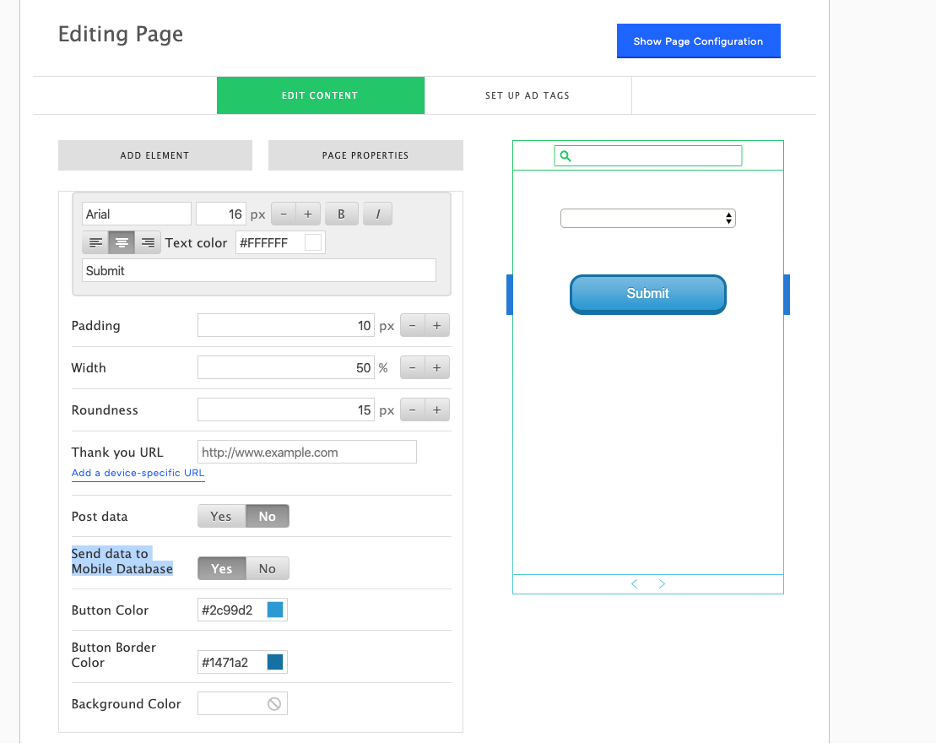
Once your mobile page is set up to collect whichever custom fields you’d like, you’ll want to ensure that the data is submitted to Vibes’ mobile database.
To return the data to the Vibes mobile database, on the "Form Submit" option in the mobile page editor, make sure that the option to "Send data to Mobile Database" is set to "Yes". This will send the data to your Vibes mobile database.
Syncing your dataIf you are using a CRM or CDP to store data, you can use data syncing to return data to your external systems. See our data syncing guide for more help.
Updated over 1 year ago