Event-Triggered Messaging
With the rise of curbside pickup, same-day delivery, and other time-sensitive customer journeys, text and push messages are a way to communicate with your customers in real time.
For example, say you want to send your customer a text to let them know their product is on the way. By creating a day_of_delivery event and then setting up a message campaign to be sent when the event occurs, you can keep your customer in the know with time-sensitive information.
This article will walk you through a step-by-step of how to set up an event-triggered message campaign. To learn more about the APIs we’ll be using to set this up, visit the Event API and the Event-Triggered Message API pages in the API Reference tab.
Performance considerations
- Events have a maximum size of 16KB. Any submissions larger will fail and return an error.
- If you are using Version 2 of the APIs, then the mobile number must use E.164 format.
Event-Triggered Message Scenario
For the sake of this guide, we will imagine a scenario in which you’d like to send your customer an SMS or push notification on the day of product delivery. You’d also like the message to:
- Contain the details of the order
- Be personalized with the customer’s first name
- Display the expected delivery time
- Link to the customer’s order details
Step 1: Create the campaign
Your first step is to create an API-Triggered Message. This can be done either in the Vibes Platform or via an API call. For the sake of this guide, we will cover how to create the message in the platform, but if you’d like more information on how to do this via API call, see our Event-Triggered Campaign API.
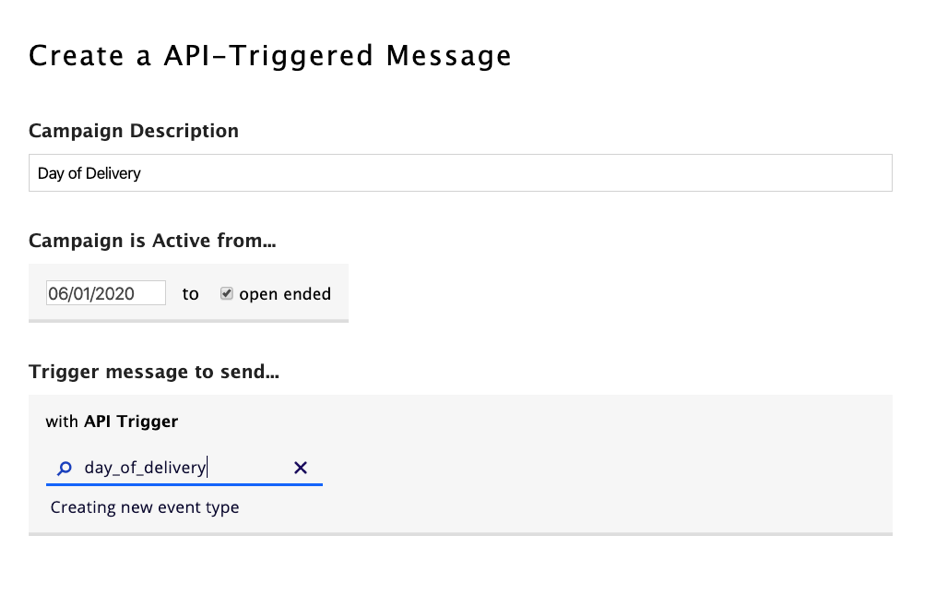
To do this in the platform, go to your Campaign Manager and select the “Triggered” tab. Then click “Create” and choose an API-Triggered Message.
Define your Campaign Description and active dates before moving to the API Trigger section and define the event_type by giving the trigger in a name that accurately describes the event that will be sent. For this example, we will be using day_of_delivery as our event_type.
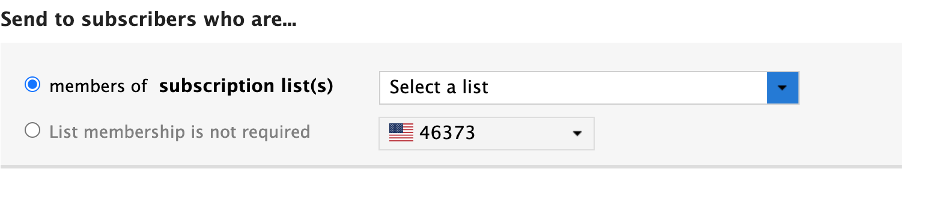
Sending to non-subscribersIf you’d like to send event-triggered messages to users not on a subscription list, you can select “List membership is not required." However, please note that if you choose this option, it is your responsibility to ensure the end user has consented to receiving text messages in response to these events. See the TCPA act summary on FCC.gov for more information.
Step 2: Craft the content
Then, move on to crafting the message content. To use data from the specific event, add tags using this format:
{{ev.FIELD_NAME}}
For example, for a field named first_name, you would include:
{{ev.first_name}}
You can insert any collected information from the Vibes person record into the message. You can also send personalized wallet passes. Be sure to pay careful attention to the formatting here; if the tag is not formatted correctly, your message may not render correctly to the customer.
Here’s the content we’ll be using for our day of delivery example:
Hi {{ev.first_name}}! Your order of {{ev.order_description}} will be delivered today. For order details: {{ev.order_url}}
Reply HELP for help, Reply STOP to cancel. Msg&data rates may apply.
Step 3: Trigger the event
Your third-party application will be responsible for sending the event to our Event API and including all necessary information. To start, the event must contain the event_type, which will tell our system which message to send. It can also include any event_data that we’d like. For example, this includes a description of the order, which we called order_description.
Once this call reaches our Event API, the message will be triggered.
Here’s our example Event JSON:
{
  "event_type": "day_of_delivery",
  "event_data": {
    "first_name": "Bob",
    "mdn": "5555555555",
    "order_description": "2 large packages",
    "order_url": "https://example.com/orders/12345"
  }
}
Note that this call uses MDN to identify the recipient. You can also use external_person_id, person_id, or vibes_device_id, but one of the four fields—whichever you are using as an identifier—must be present in the event_data object to send the message.
Step 4: Your message is sent
Message processingIt’s important to note that an event being successfully received by Vibes doesn’t necessarily mean your message was sent. Once an event is successfully received, Vibes must process the data, and if the data is incorrect or incorrectly formatted, it may result in a failed delivery. To monitor your event-triggered messages, we recommend setting up event-triggered callbacks.
When our API receives the request, we will attempt to send the message. The values in the event_data object are substituted for the placeholders we included in the message content and the URL is shortened, resulting in delivery of the following message to the recipient:
Hi Bob! Your order of 2 large packages will be delivered today. For order details:http://vbs.cm/abc123
Reply HELP for help, Reply STOP to cancel. Msg&data rates may apply.
That’s it! Once your third-party application starts sending these events, your messages will begin to go to your customers. Note that you can also do this for push notifications if you have the Push Notifications SDK installed.
Can I schedule a message for later?Events will immediately trigger messages and can't be scheduled in advance.
Best Practices
Now that you know how to set up an event-triggered message and how to trigger the message, here are some best practices to consider.
- Use meaningful event types that describe the event in some way. The same concept applies to tokens in the message template.
- When you’re testing the event-triggered template, rather than constructing the entire message and passing it to the API, try creating a template and only providing in the event payload the dynamic data to populate the template.
- This is especially true if you are sending SmartLinks in events. Put the SmartLink in the template and only pass in data that is unique to the pass being delivered.
- The Event API will accept 300 requests/second. If you anticipate greater volume, consider using a message queue to send the requests so retries and throttling can be applied if necessary.
- To track your messages, set an ' event_id '.
event_ids must be unique. If you attempt to reuseevent_ids, the message will not be sent. - Use event-triggered callbacks to receive information about message delivery.
- Event message content supports Liquid Template Language syntax.
Updated over 1 year ago