File-Triggered Messaging
Another way to send messages to a list of subscribers is through a file-triggered campaign. To use this feature, you’ll create a campaign in the platform that automatically sends messages in response to a flat file (CSV) being uploaded into the platform. These files will be handled and routed based on the file name.
In this article, we’ll teach you how to format and name the file, how to set up the trigger logic, and where to upload the file.
File-Triggered Message Scenario
In this guide, we’ll imagine we want to send our customers a reminder to use their rewards points before they expire. In the message, we want to give each customer information specific to them, such as their point balance and the date those points expire, so we will include that information in our file.
Step 1: Formatting your file
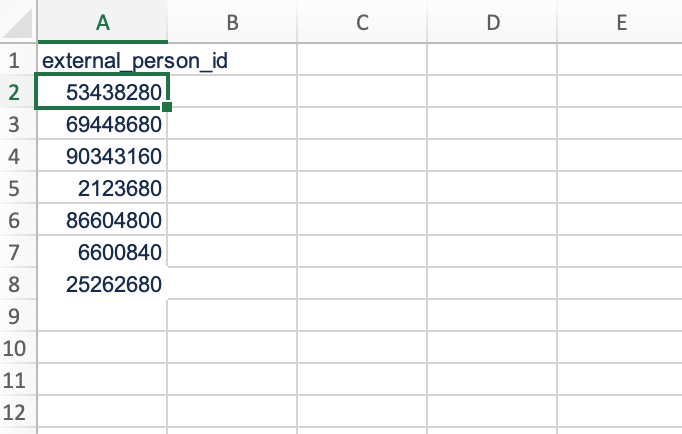
Files for file-triggered messages must be formatted in a Vibes-specific format known as a recipient list. Recipient lists must include a unique identifier for each subscriber, such as person_key, external_person_id, vibes_device_id, or MDN.
The first column of your spreadsheet must include whatever field you’ll be using as an identifier. In our example, we’ll be using external_person_id as our identifier, so that’s what we’ll put in our first column. To tell the system which identifier we’re using, we’ll name the first row of the first column external_person_id.
Note that the column headers must be in lowercase.
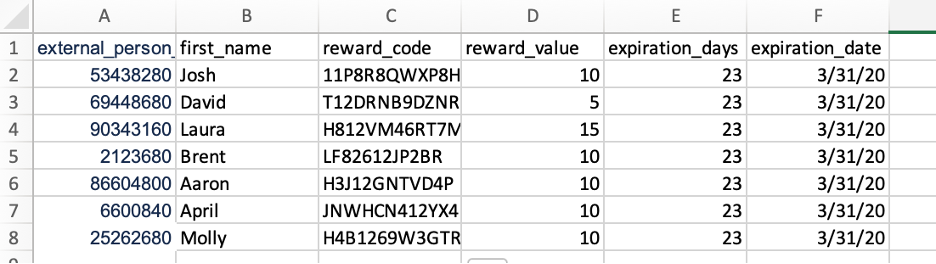
From there, you can also further customize the fields with file-specific data for each subscriber. In our example, we’d like to personalize the message with the customer’s name and give them helpful information about their specific rewards. Here’s how we’ve formatted the rest of the file:
Learn more about recipient listsFor more on formatting as well as some possible error messages, see our Recipient List Import page.
Step 2: Create a file-triggered broadcast
The first step to setting up a file-triggered broadcast, which must be done in the Vibes Platform UI. Once you’re in the Campaign Manager, head over to the “Campaigns” tab and click to create a new campaign. Choose a file-triggered SMS or push notification. For the purposes of our tutorial, we’ll be selecting the option for a file-triggered SMS campaign.
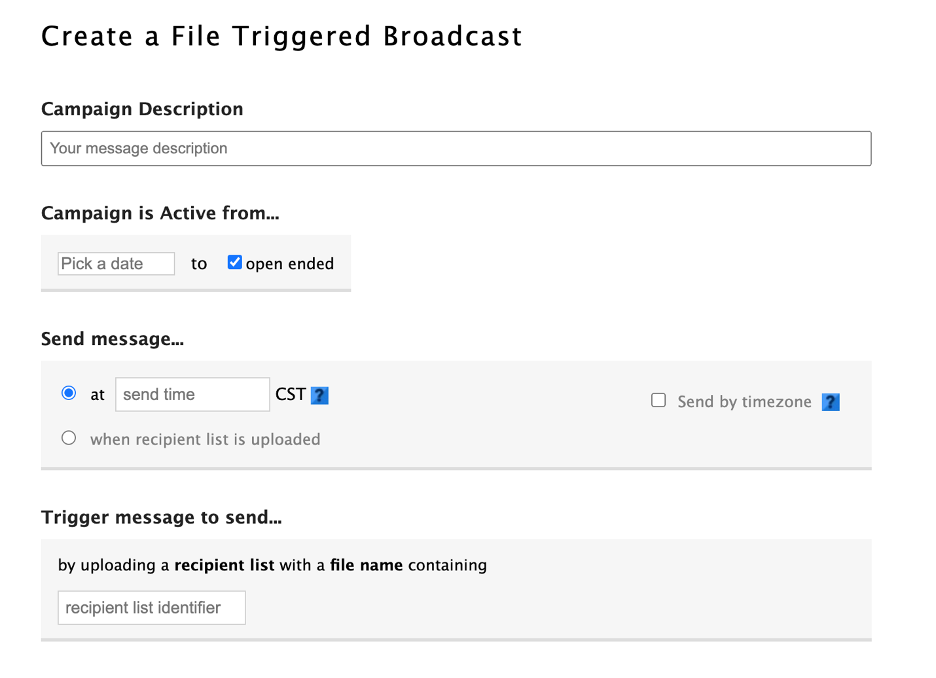
Fill the Campaign Description and date/time info. Note that you can choose a time for the message to be sent or set it so that the message is sent when the file is uploaded.
When you get to the section labeled “Trigger message to send,” use a unique and memorable identifier that you can include in the file name. You won’t be able to change this identifier later, so be sure to choose an identifier that you will remember and will stand out from other campaigns.
The purpose of this identifier is to let the system know which campaign the file relates to. Any file that is uploaded with this specific identifier will trigger this campaign. For our example, we’ll enter: rewards_expiration_reminder
Keep this identifier handy! It’ll come in later in this guide.
Then, select one or more subscription lists. For compliance reasons, the persons identified on your recipient_list files must also appear on one or more of the selected subscription lists. If any person listed in your in your file is not on one or more of the subscription lists selected, the message will not be sent.

Step 3: Crafting your message
Now we’ll move onto the actual body of the message—i.e. the message your customers will get. Here’s where we’ll get to use some of the custom fields we added into our file.
For our message, we want to greet the customer, tell them the value of their expiring points, tell them when the points will expire, and finally, prompt them to use the points before they’re gone. For every variable we want to provide, we will denote the variable as such:
{{rl.COLUMN_HEADER}}
For example, if the column has been called first_name, the variable would be {{rl.first_name}}.
Below is an example of the message content we’d put in our campaign.
Hi, {{rl.first_name}}! Your ${{rl.reward_value}} reward is expiring in {{rl.expiration_days}} days! Use code {{rl.reward_code}} before {{rl.expiration_date}}! Reply HELP for help, Reply STOP to cancel. Msg&data rates may apply
Step 4: Name your file
The basic structure for each recipient list is as follows: <filename>.recipient_list
The beginning of the file name is customizable by campaign, but every file must end in .recipient_list.
When we set up our file-triggered campaign, we used rewards_expiration_reminder as our file identifier, so we’ll name our file accordingly. But since we may want to send multiple lists to these campaigns, we’ll want to add more than just that to the file name. A good way to diversify file names is to use the date to differentiate files.
For our example, we’ll name our file: rewards_expiration_reminder_03302020.recipient_list
Remember, this file name will ensure the routing of this file to the correct campaign, so be sure to check and double-check your work.
Step 5: Upload your file or set up your automation
As the final step, you’ll set up your file to upload.
While you can do this manually, we recommend setting up a script to create and drop files into a SFTP system connected to the platform for. For more help creating an automation, reach out to your Vibes account representative.
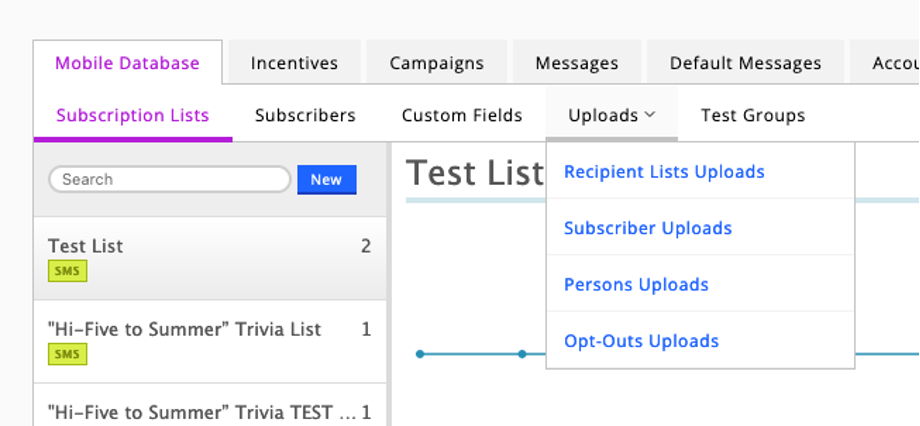
For ad-hoc file drops, you can do so in the platform. In the Mobile Database tab, go to “Uploads” and then “Recipient List Uploads.” Then, pick your file to upload.
A few things to note:
- If you specified a time for your campaign to be set, your messages will be queued and sent out at that specific time. If the upload does not complete until after the specified time, the messages will be queued for the next day.
- If you did not specify a time for your campaign to send, the messages will be sent as soon as the file uploads.
- If the person in the file is not already subscribed to the SMS master list you have selected in the campaign, the message will not be sent. For compliance purposes, the recipient must have opted-in to your subscription list to receive messages.
Step 6: Your message is sent
Once your file is uploaded, the messages will either be sent immediately or be added to the masked queue to send at the specified time. If all has been formatted correctly, the custom fields will be replaced with the correct value for each user.
In our example, this is how our message would be displayed for the first customer in our spreadsheet:
Hi, Josh! Your $10 reward is expiring in 23 days! Use code 11P8R8QWXP8H before 3/31/2020! Reply HELP for help, Reply STOP to cancel. Msg&data rates may apply
That’s it! As you get more users, you can also upload more files to this campaign and send out even more expiration notices.
Notes
Timing
Remember that when your message is sent is set at the campaign level, not the file level. When you set up the file-triggered campaign, you have the option to set the messages to be sent immediately after file upload or at a specific time in the day. If you chose a specific time, the message will be added to a masked queue and sent at the specified time.
Note that it will only be added to the queue once the file upload is complete. If the file finishes uploading after the specified time, the message will be sent at that time the next day.
Deleting a Campaign
The only means of deleting a campaign that has been processed through the Vibes Platform is by performing an API call to delete the campaign. Once the campaign has been deleted, an updated file can be dropped to initiate the new SMS. You will need the campaign id and company_key to perform this action.
Example
DELETE /companies/:company_key/mobiledb/broadcasts/:broadcast_idProcess Notes
- File Trigger Message Content supports Liquid Markup Language syntax.
- If a
person_key,person_id,mdn, andexternal_person_idis on the file more than once, they will only get the first message. The Vibes platform de-dupes. - If multiple campaigns have the same keyword trigger, one file can be utilized to trigger multiple campaigns in the platform. By setting up two campaigns with different filters, you can segment the recipient list. If you’d like to use this feature, reach out to your account rep for more information.
Updated over 1 year ago