Associate Person to Device
At first download of an app, a customer is defined by a vibes_device_id and a Vibes person_key, but are unknown and cannot be matched back to a customer within an external CRM. The process of associating a person to a device is to identify a person with a unique identifier, such as a customer id or a loyalty id. This identification enables platform campaign segmentation, multiple push device support, cross channel mapping (SMS, MMS, Wallet), and to be matched back to the external CRM.
To effectively target by Person and Person custom fields, the Vibes Platform needs to have associated a device with a Person.
There are two methods to do this association:
- Server side association (recommended)
- Client side association
Usingexternal_person_idacross channelsThe
external_person_idmust be the same on the SMS/MMS and Push channels to initiate the cross-channel person mapping.
Associate Person to Device - Server Side
This association is done by a sever-to-server call sending the vibes_device_id and external_person_id to associate the device to the person. Vibes recommends a server-to-server call to associate accounts to devices to prevent account hijacking.
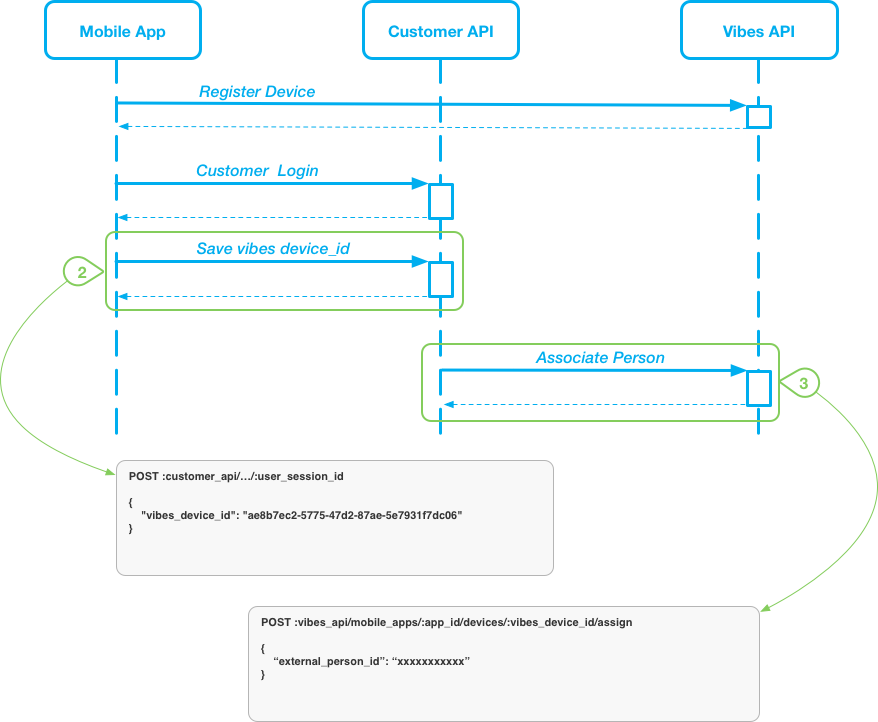
Associating the vibes_device_id with an external_person_id requires the following three-step process:
- The mobile app, via the Vibes SDK, will register the device in the Vibes Platform via the Vibes SDK. This returns the
vibes_device_id. - The mobile app will authenticate the app user via login and send the
vibes_device_idto the custom-built API. - The customer server will send the
external_person_idand thevibes_device_idto the Vibes Associate Person call.
Step 1: Register the device
To retrieve the vibes_device_id, the mobile app will listen to the response from the Vibes SDK register device call. Review the iOS and Android integration topics for more information.
Step 2: Send vibes_device_id to Customer API
vibes_device_id to Customer APIAfter the device is registered, the customer application needs to save or pass through the vibes_device_id property that was received in the registerDevice response.
This will require a custom-built API to pass the vibes_device_id or add the vibes_device_id property in custom customer_login call.
The following is an example customer API call. Note that this is just a suggested API structure. You can implement this API call in whatever way makes sense for your system, as long as the mobile user is securely authenticated.

Response Types
The following are possible responses from the customer endpoint:
| Status Code | Definition | Response Type |
|---|---|---|
| 204 | The vibes_device_id saved. | Success |
| 403 | (Forbidden) The session has expired or the token is invalid. | Failure |
| 422 | There is a validation problem with the request. The resulting error will give details. | Failure |
Step 3: Send vibes_device_id and external_person_id to Vibes Associate Person API
vibes_device_id and external_person_id to Vibes Associate Person APIThis call assigns a given device to a specific person. The caller supplies a person_key or external_person_id to associate the device to. If both are supplied, the person_key will be used and the external_person_id will be ignored.
- If a
person_keyis supplied, and a person with thatperson_keydoes not exist, that will result in an error. - If an
external_person_idis supplied and a person with thatexternal_person_iddoes not exist, then theexternal_person_idwill be assigned to the person currently associated with the device. - In either case, if the indicated person exists and the device is not already associated with them, it will be moved to be associated with them.
- If the indicated person is already associated with the device, then nothing will be done and a success response will be returned.
Use the Associate Push Device to Person API to assign a given device to a specific person as defined by their person_key or external_person_id_
Associate Person to Device - Client Side
To effectively target by Person and Person custom fields, the Vibes Platform needs to have associated a device with a Person. By default, devices can only be associated server side — a 403 forbidden response will be returned if the association is done directly from the device. If you want to enable a client-side association for your app, you must contact Vibes to enable this setting.
Android
Use the following code to directly update the Person to the device. The external_person_id is your internal reference to the Person.
You can add the code wherever it makes the most sense for your application.
Kotlin:
Vibes.getInstance().associatePerson(externalPersonId, object : VibesListener<Void> {
    override fun onSuccess(value: Void?) {
        //Handle Success
    }
    override fun onFailure(error: String) {
        //Handle Failure
    }
}
Java:
Vibes.getInstance().associatePerson(externalPersonId, new VibesListener() {
    @Override
    public void onSuccess() {
        //Handle Success
    }
    @Override
    public void onFailure(String error text) {
        //Handle Failure
    }
});
iOS
Use the following code to directly update the Person to the device. The external_person_id is your internal reference to the person.
You can add the code wherever it makes the most sense for your application.
let externalPersonId = "external user id"
Vibes.shared.associatePerson(externalPersonId: externalPersonId)
Delegate method:
func didAssociatePerson(error: Error?) {
  if let error = error {
    // there was an error associating the person with this device
  } else {
    // the person was successfully associated with this device
  }
}
iOS Objective-C
Use the following code to directly update the person to the device. The external_person_id is your internal reference to the person.
You can add the code wherever it makes the most sense for your application.
NSString \*externalPersonId = @"external user id";
\[[Vibes shared] associatePersonWithExternalPersonId:externalPersonId];
Delegate method:
-(void)didAssociatePersonWithError(NSError \*error) {
  if (error == nil) {
    // there was an error associating the person with this device
  } else {
    // the person was successfully associated with this device
  }
}
Updated about 1 year ago