Integration: V4 Swift
The following information will show you how to integrate the Vibes Push Notifications SDK (v.4+) into an iOS app.
The Swift iOS Example app is also available to show you how to implement the SDK.
Key Integration Steps
- Implement basic device and push registration to simple push notifications.
- Enable association of push to device API or SDK call. This will make a user "known" and allow for platform targeting and segmentation. Note: If you are using cross channel segmentation between channels, the
external_person_idmust be the same in the SMS, Push, and Wallet channels. - Add advanced push options: rich push, notification sounds, deep linking, etc (Optional)
- Add app inbox support (Optional)
Note: Platform accounts are available via the platform for development and UAT testing.
App Configuration
Add the following to your application:didFinishLaunchingWithOptions in your AppDelegate.swift file:
Vibes.configure(appId: "YOUR_APP_ID")The Vibes SDK will notify your app of any failed or successful API calls via a delegate. When configuring the Vibes SDK, assign the delegate to any class implementing the VibesAPIDelegate protocol.
For example, you could set the delegate to your App Delegate immediately after configuration:
		...
    Vibes.configure(appId: "YOUR_APP_ID")
    Vibes.shared.set(delegate: self)
}

func didRegisterPush(error: VibesError?) {
    ...
}
If, for any reason, you want to override the default API URL, tracked event type, storage type, advertisingID (if you use AdSupport), or the default logger, pass in an optional configuration:
let config = VibesConfiguration(advertisingId: "YOUR_ADVERTISING_ID", //optional
                                apiUrl: nil, //defaults to US endpoint as defined below
                                logger: nil, // implement VibesLogger to configure your own logger
                                storageType: .USERDEFAULTS, // default is .KEYCHAIN
                                trackedEventTypes: [TrackedEventType.launch, TrackedEventType.clickthru] as NSArray)
Vibes.configure(appId: "YOUR_APP_ID", configuration: configuration)
You must reset the Vibes default endpoint if you want to use the Vibes Platform Europe instance, as defined in Technical Details.
- Default Vibes Push endpoint (US): https://public-api.vibescm.com/mobile_apps
- Vibes Push Europe endpoint (UK): https://public-api.vibescmeurope.com/mobile_apps
Registering a Device
Add the following code wherever it makes the most sense for your application.
Vibes.shared.registerDevice()Delegate method:
func didRegisterDevice(deviceId: String?, error: Error?) {
    ...
}
Unregistering a Device
Add the following code wherever it makes the most sense for your application.
Vibes.shared.unregisterDevice()Delegate method:
func didUnregisterDevice(error: Error?){
    ...
}
Push Messaging
Registering for Push
- Register for remote notifications by following the OS Local and Remote Notification Programming guide.
- Add the following code to your app delegate.
func application(\_ application: UIApplication, didRegisterForRemoteNotificationsWithDeviceToken deviceToken: Data) { ... Vibes.shared.setPushToken(fromData: deviceToken) Vibes.shared.registerPush() ... } - Delegate method:
func didRegisterPush(error: Error?) {
    ...
}
Unregistering for Push
Add the following code wherever it makes the most sense for your application.
Vibes.shared.set(delegate: self)
Vibes.shared.unregisterPush()
Delegate method:
func didUnregisterPush(error: Error?) {
    ...
}
Update Device
A developer may want to submit period updates about changes in state from devices to the Vibes platform to make sure that targeting information is up-to-date. The most up-to-date device information (device timezone, your app version, vibes SDK version etc) will be submitted, as well as GPS location changes if it is enabled by the user of the app and the developer is collecting that information.
YourViewController: VibesAPIDelegate {

    func someFunction() {
       Vibes.shared.delegate = self
       Vibes.shared.updateDevice(lat: Double, long: Double, updateCredentials: Bool)
    }


   func didUpdateDevice(error: Error?) {
       if let error = error {
           // handle error
       } else {
          // update successful
       }
   }
}
It is recommended to pass false as the value for updateCredentials, unless you want to update the credentials with which the device connects to the Vibes platform.
Event Tracking
Launch, clickthru, and pushreceived events are mostly automatically tracked for you, although to properly track clickthru events, you must add the following to your AppDelegate:
# iOS 9
extension AppDelegate {
    func application(_ application: UIApplication, didReceiveRemoteNotification userInfo: [AnyHashable : Any], fetchCompletionHandler completionHandler: @escaping (UIBackgroundFetchResult) -> Void) {
        VibesPush.Vibes.shared.receivedPush(with: userInfo)
    }
}


# iOS 10
extension AppDelegate: UNUserNotificationCenterDelegate {
    public func userNotificationCenter(_ center: UNUserNotificationCenter, willPresent notification: UNNotification, withCompletionHandler completionHandler: @escaping (UNNotificationPresentationOptions) -> Void) {
      VibesPush.Vibes.shared.receivedPush(with: notification.request.content.userInfo)
      completionHandler([])
    }
}
Deep Link
Deep linking consists of adding functionality to go to a specific view, a particular section of a page, or a certain tab. If you have deep linking enabled in your push notification setup, you can retrieve its value in the push notification payload.
{
  "aps": {
    "alert": {
      "title": "Push Notification!",
      "subtitle": "From Vibes",
      "body": "You did it! "
    }
  },
  "client_app_data": {
    ...
    "deep_link": "XXXXXXX",
    ...
  },
  "message_uid": "9b8438b7-81cd-4f1f-a50c-4fbc448b0a53"
}
Sample code for parsing the push notification payload and navigating to the deep link:
@available(iOS 10.0, *)
func userNotificationCenter(_ center: UNUserNotificationCenter, didReceive response: UNNotificationResponse, withCompletionHandler completionHandler: @escaping () -> Void) {
    handlePushNotification(userInfo: response.notification.request.content.userInfo)
    completionHandler()
}


// For iOS 9
func application(_ application: UIApplication, didReceiveRemoteNotification userInfo: [AnyHashable : Any], fetchCompletionHandler completionHandler: @escaping (UIBackgroundFetchResult) -> Void) {
    handlePushNotification(userInfo: userInfo)
    completionHandler(.newData)
}

fileprivate func handlePushNotification(userInfo: [AnyHashable : Any]) {
    // Allow Vibes to track the .launch and .clickthru events from the notification
    Vibes.shared.receivedPush(with: userInfo)

    // Check for a deep link in the payload
    guard let clientData = userInfo["client_app_data"] as? [String: Any],
        let deepLink = clientData["deep_link"] as? String
        else { return }

    // Use deepLink here to navigate to the appropriate view controller
}
Notification Sound
If your application contains a custom sound for a push notification, you can specify this sound on the Vibes Platform. The push payload received will look like the following:
{
  "aps": {
    "alert": {
      "title": "Push Notification!",
      "subtitle": "From Vibes",
      "body": "You did it! "
    },
    "sound":"sound.filename",
  },
  "message_uid": "9b8438b7-81cd-4f1f-a50c-4fbc448b0a53"
}
The sound will be played automatically if the sound file exists in your project resources.
Custom Properties
You can specify up to 10 key-value pairs on the Vibes Platform. The push payload received will look like the following:
{
  "aps": {
    "alert": {
      "title": "Push Notification!",
      "subtitle": "From Vibes",
      "body": "You did it! "
    }
  },
  "client_custom_data":{
      "key1":"val1",
      "key2":"val2",
      ....
   },
  "message_uid": "9b8438b7-81cd-4f1f-a50c-4fbc448b0a53"
}
In your application, you can retrieve the custom data like this:
@available(iOS 10.0, *)
func userNotificationCenter(_ center: UNUserNotificationCenter, didReceive response: UNNotificationResponse, withCompletionHandler completionHandler: @escaping () -> Void) {
    if let customData = response.notification.request.content.userInfo["client_custom_data"] as? [String: Any] {
        // Use customData here
    }
    ...
}

// For iOS 9
func application(_ application: UIApplication, didReceiveRemoteNotification userInfo: [AnyHashable : Any], fetchCompletionHandler completionHandler: @escaping (UIBackgroundFetchResult) -> Void) {
    if let customData = userInfo["client_custom_data"] as? [String: Any] {
        // Use customData here
    }
    ...
}
Badge
On the Vibes Platform, you can specify your application badge value. The push payload received will look like the following:
{
  "aps": {
    "alert": {
      "title": "Push Notification!",
      "subtitle": "From Vibes",
      "body": "You did it! "
    },
    "badge":1,
  },
  "message_uid": "9b8438b7-81cd-4f1f-a50c-4fbc448b0a53"
}
Category
Push notification category is a new feature from iOS 10.+. On the Vibes Platform, you can specify the category of your push notification. The push payload received will look like the following:
{
  "aps": {
    "alert": {
      "title": "Push Notification!",
      "subtitle": "From Vibes",
      "body": "You did it! "
    },
    "category":"some category"
  },
  "message_uid": "9b8438b7-81cd-4f1f-a50c-4fbc448b0a53"
}
Please check the Apple documentation for how to configure categories and actionable notification.
Rich Media: Image, Video, Audio
From version iOS 10, you can send rich content embedded (image, video, or audio) in push notifications. Please check the Apple documentation to check how to integrate rich push capability to your application.
On the Vibes Platform, you can specify the rich content you want your customers to see.
The push payload received will look like the following:
{
  "aps": {
    "alert": {
      "title": "Push Notification!",
      "subtitle": "From Vibes",
      "body": "You did it! "
    },
    "mutable-content":1
  },
  "client_app_data":{
      "client_message_id":"fgfCHIUHIY8484FYIHWF",
      "media_url" : "https://www.publiclyhostedurl.com"
   },
  "message_uid": "9b8438b7-81cd-4f1f-a50c-4fbc448b0a53"
}
Silent Push
On the Vibes Platform, you can specify to send a push notification as a silent or background push. Silent or background push notification can be used to update a badge payload or send custom data to the app. A push notification received will look like the following:
{
  "aps": {
    "content-available": 1
  },
  "message_uid": "9b8438b7-81cd-4f1f-a50c-4fbc448b0a53"
}
Person Management
Since v 4.0.0, it is now possible to fetch a Person record, which is also accessible via the Person API as documented here.
The Structure of a Person
A Person exposes the following methods for obtaining more information.
| Method | Comment |
|---|---|
| public var personKey: String? | Returns the UUID that uniquely identifies the user associated with the device. |
| public var mdn: String? | Returns the MDN of the user associated with the device. |
| public var externalPersonId: String? | Returns the external_person_id that may have been specified for this user associated with the person. |
Fetching the Person Record
The person associated with the device can be obtained by calling the getPerson method on the Vibes SDK.
Vibes.shared.getPerson() {
 (person: Person ? , error : VibesError ? ) in
 if let error = error {
  // error occurred, handle it
  return
 }
 let personKey = person.personKey
  // use the person key and other person information
  ...
}
Inbox support is now available in v 4.0.0 and later of the Vibes Push SDK. The current feature set only enables obtaining and updating these inbox messages and does not provide any UI components for rendering the inbox messages.
App Inbox
Inbox support is now available in v 4.0.0 and later of the Vibes Push SDK. The current feature set only enables obtaining and updating these inbox messages and does not provide any UI components for rendering the inbox messages.
Initializing the Inbox Support
There is no additional requirements for configuring the support for inbox messages beyond the standard process for configuring the iOS Push SDK documented here.
The Structure of an InboxMessage
An inbox may be constructed within your app using the Vibes Inbox components to match the design of your app. Here is an example of simple inbox construction, but multiple designs are possible. If additional fields or images are required, custom properties can be used for that purpose.
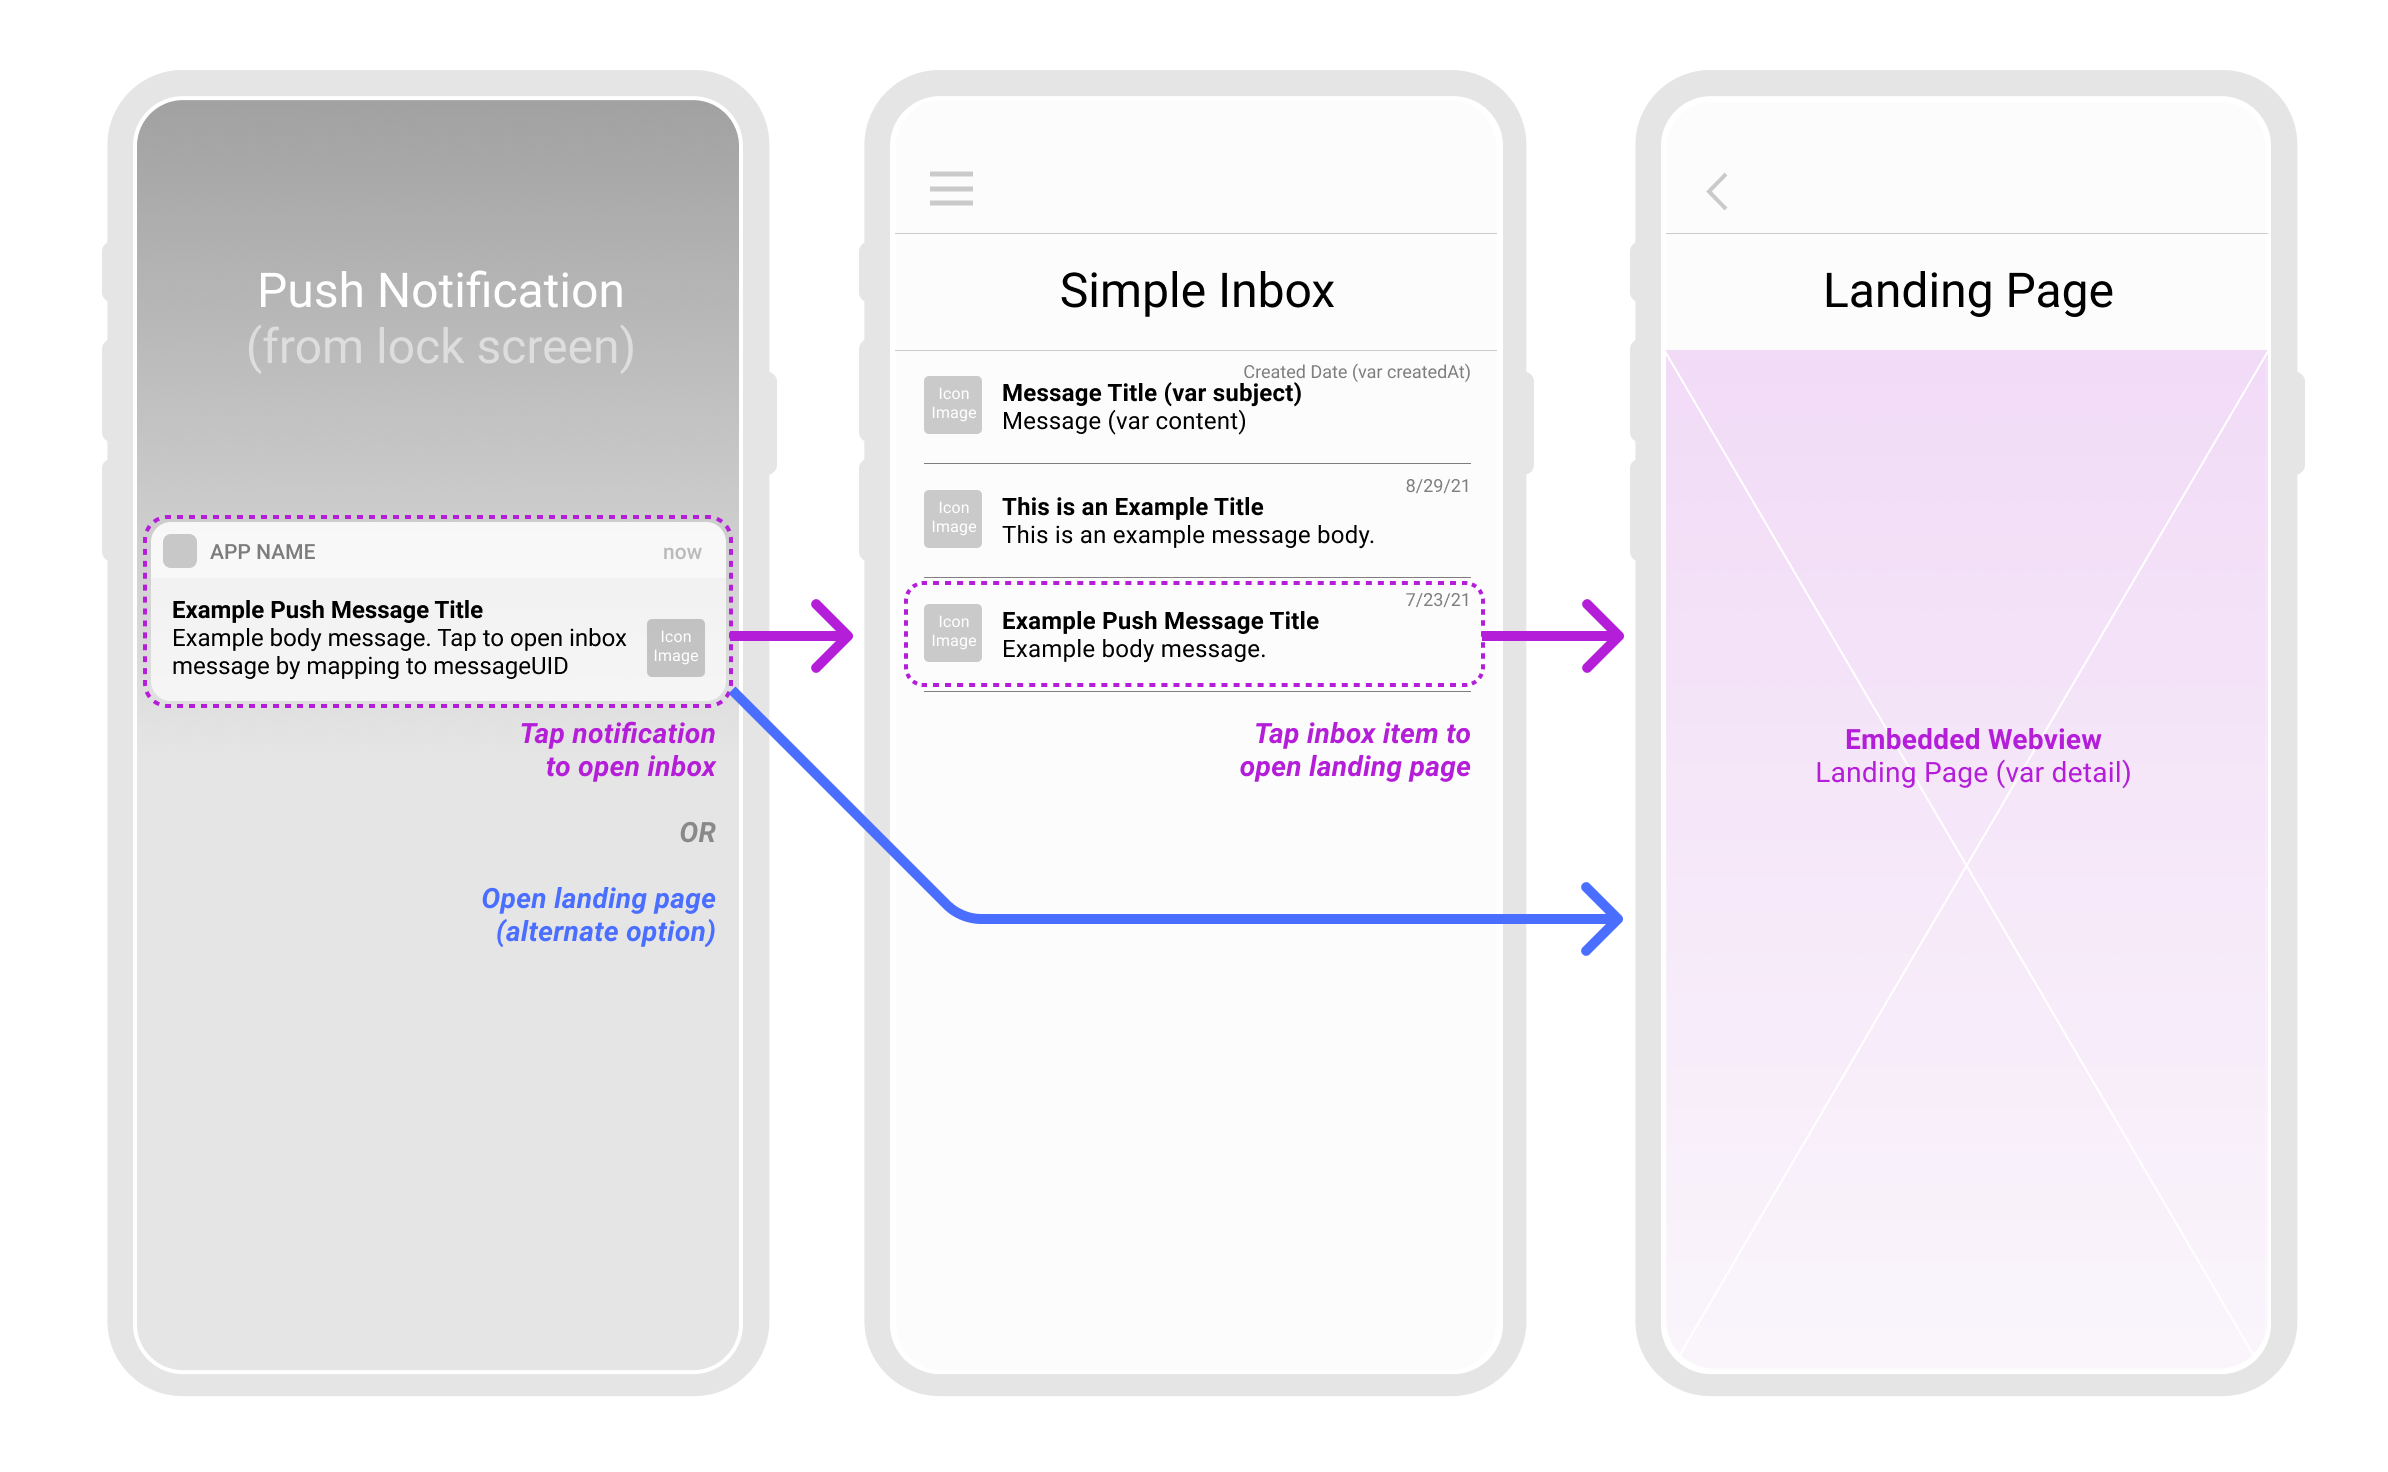
An InboxMessage class exposes the following fields for obtaining information about an inbox message.
| Field | Comment |
|---|---|
| public var messageUID: String? | Returns the messageUID that uniquely identifies this inbox message. |
| public var subject: String? | Returns the subject that can be used as a header for an inbox message. |
| public var content: String? | Returns the content for further textual information to the reader of the message. |
| public var detail: String? | Returns a URL that may lead to an image, a web page or any rich media that one may want to display as the landing page of the inbox message. |
| public var read: Bool? | Returns true or false to determine if the message has previously been read by the user of the app. |
| public var expiresAt: Date? | Returns a timestamp of when a message will be considered expired. |
| public var collapseKey: String? | Returns a key that is used to remove other messages previously sent with the same key. |
| public var createdAt: Date | Returns the date on which the message was created on the platform. |
| public var iconImage: String? | Returns a URL that points to an image that can displayed as an icon for an inbox message list (1 of 2). |
| public var mainImage: String? | Returns a URL that points to an image that can displayed as an icon for an inbox message list (2 of 2). |
| public var inboxCustomData:[String: AnyObject] | Contains a map of custom data that you can pass to the app per message. |
| public var inboxMessageUID: String? | A UID which maps a push message to this inbox message. |
Fetching Inbox Messages
A list of maximum 200 messages for each user of the app can be fetched by invoking the fetchInboxMessages method as show below. On success, an array of InboxMessages is returned, otherwise there is an error passed to the callback.
Note that by default, these messages are sorted in descending order by date created, which means the most recent message will be first in the collection.
Vibes.shared.fetchInboxMessages() {
 (messages: [InboxMessage], error: VibesError ? ) in
 if let error = error {
   // error occurred, handle here
   return
  }
  // use messages
  ...
}
Fetching A Single Inbox Message
A single inbox message can be fetched by invoking fetchInboxMessage with the messageUID of the requested message as shown below. On success, a single InboxMessage is obtained, otherwise there is an error passed to the callback.
Vibes.shared.fetchInboxMessage(messageUID: messageUID) {
 (message: InboxMessage, error: VibesError ? ) in
 if let error = error {
   // error occurred, handle here
   return
  }
  // use the message
  ...
}
Call the inbox_open event trigger after calling the fetchInboxMessage function to represent opening an inbox message. This will trigger inbox_open event for the inbox message. This will track customer engagement for platform reporting.
Vibes.shared.onInboxMessageOpen(inboxMessage: message)Marking an Inbox Message as Read
An inbox message can be marked as read so it could possibly be rendered differently from unread inbox messages. This is done by invoking markInboxMessageAsRead with the messageUID of the requested message as shown below. On success, an updated version of the InboxMessage is returned, otherwise there is an error passed to the callback.
Vibes.shared.markInboxMessageAsRead(messageUID: messageUID) {
 (message: InboxMessage, error: VibesError ? ) in
 if let error = error {
   // error occurred, handle here
   return
  }
  // use the updated message
  ...
}
Expiring an Inbox Message
An inbox message can be marked as expired which would automatically make it unavailable for viewing when inbox messages are re-fetched again. This is done by invoking expireInboxMessage with the messageUID of the requested message as shown below. On success, an updated InboxMessage is returned with the expirationDate set; otherwise, there is an error message passed to the callback.
Vibes.shared.expireInboxMessage(messageUID: messageUID) {
 (message: InboxMessage, error: VibesError ? ) in
 if let error = error {
   // error occurred, handle here
   return
  }
  // use the updated message
  ...
}
Push Message Linked to An InboxMessage
Since v 4.0.0, it is now possible for a push message to contain a pointer to an inbox message called inboxMessageUid. In such a scenario, one can override the default VibesReceiver, fetch the associated InboxMessage, and then open your own custom detail screen when such a message is received. Below is an example:
@available(iOS 10.0, *)
func userNotificationCenter(_ center: UNUserNotificationCenter, didReceive response: UNNotificationResponse, withCompletionHandler completionHandler: @escaping() -> Void) {
 print(">>> receive remote push notif")

 if let clientAppData = response.notification.request.content.userInfo["client_app_data"] as ? [String: Any] {
  // retrieve inbox message UID and pass it to Rx observers
  if let inboxMessageUID = clientAppData["inbox_message_uid"] as ? String {
   Vibes.shared.fetchInboxMessage(messageUID: inboxMessageUID) {
    (message: InboxMessage, error: VibesError ? ) in
    if let error = error {
     // error occurred, handle here
     return
    }
    // open your custom View detail Controller
    let yourVC = YourDetailsViewController.loadFromNib()
    yourVC.message = message
    // set nav bar
    let navCont = UINavigationController(rootViewController: yourVC)
    self ? .present(navCont, animated: true, completion: nil)
   }
  }
 }
}
Enhanced Logging
Version 4.3.0 of the SDK now supports improved logging.
The SDK supports the following log levels
· ERROR
· WARN
· INFO
· VERBOSE
The lowest level of logging is the VERBOSE log level, which produces the most log output. ERROR produces the least output.
Subscribing to Log Statements
To subscribe to receive all log statements, you will need to create a class that conforms to the VibesLogger protocol.
extension YourCustomLogger: VibesLogger {
    ...
}var configuration = Configuration()
let vibesConfiguration = VibesConfiguration(apiUrl: configuration.environment.baseURL,
logger: YourCustomLogger.shared,
storageType: VibesStorageEnum.USERDEFAULTS)
...
Vibes.configure(appId: configuration.environment.appKey, configuration: vibesConfiguration)
You will supply that implementation to the VibesConfiguration class during SDK initialization.
Enabling Developer LoggingDuring development, a developer may enable developer logging at a particular log level. Doing this means that all log statement with a level equal or higher than the level specified will be displayed on the console of the application. Below is an example of enabling developer logging by calling enableDevLogging.
#if DEBUG // enabled for debug only.
     vibesConfiguration.enableDevLogging()
 #else
     vibesConfiguration.disableDevLogging()
 #endif
This will produce the following example output.
[12/22/2020 19:19:56]: INFO: Initializing Vibes SDK v4.1.1
[12/22/2020 19:19:56]: WARN: AppId has changed to: UATINTEGRATIONTEST
[12/22/2020 19:19:58]: INFO: Latest version of the Vibes SDK is 4.2.0. We suggest upgrading
[12/22/2020 19:20:03]: INFO: Device registration successful
[12/22/2020 18:15:46]: WARN: App Inbox is not enabled
Best practiceWe strongly advise using the enableDevLogging only during development, as leaving logging enabled in a production version of the app may lead to higher memory consumption. By default, developer logging is disabled.
Also note that you can pass your own logger to the SDK in addition to calling enableDevLogging.
SDK Log Message Types
As can be seen from the sample output above, the SDK now generates different types of log statements.
- Current version of SDK deployed within the app, and a message about upgrading if there is a newer version
- Current Vibes appId that the SDK is configured with
- Whether app inbox support is enabled for this Vibes appId or not
- Multiple life-cycle messages about successful/unsuccessful invocation of all the major SDK functions
Sending Your Log Messages
You can also send your own log messages from your application project with the following:
Vibes.shared.configuration.logger?.log(LogObject(LogLevel.info, message: "Your log message"))Updated over 1 year ago