Salesforce Marketing Cloud Integration
For an even more seamless marketer experience, you can now integrate Vibes SMS activity with your Salesforce Marketing Cloud (SFMC) Journey Builder. With this integration, marketers can add and configure Vibes SMS activity as part of their contact journey. The integration will automatically create a Triggered Campaign in the Vibes platform, which will be used to send SMS messages to the contacts of your choice.
Skip to a section:
Integration Setup
To activate the Vibes SFMC Journey Builder integration, there's a few steps you'll have to take first. Below is a step-by-step guide of how to set up the integration for your SFMC.
As you complete the steps below, you will copy various identifiers and URLs into the SFMC Config.xlsx file that was provided by your CS contacts (indicated in italics). These config values are required for Vibes to make API requests to SFMC, upload subscriber data over SFTP, and to authenticate requests from SFMC to Vibes. Once complete, the config file should be uploaded to Vibes secure portal (see Step 8).
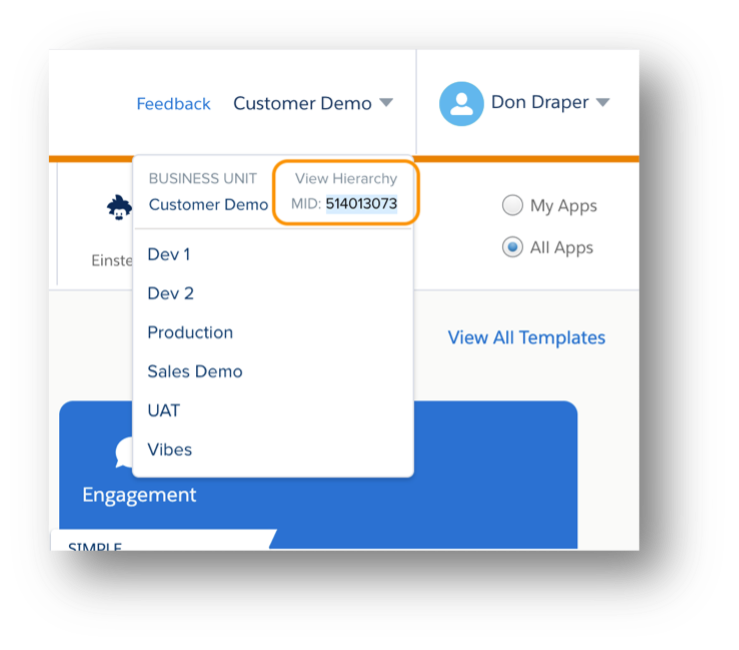
Step 1: Login and Switch Account
Login to SFMC and switch to the Business Unit that you are setting up for the integration. If you are not sure which Business Unit to use, please discuss this with your Vibes MES Lead.
Copy the MID value into the SFMC Config file.

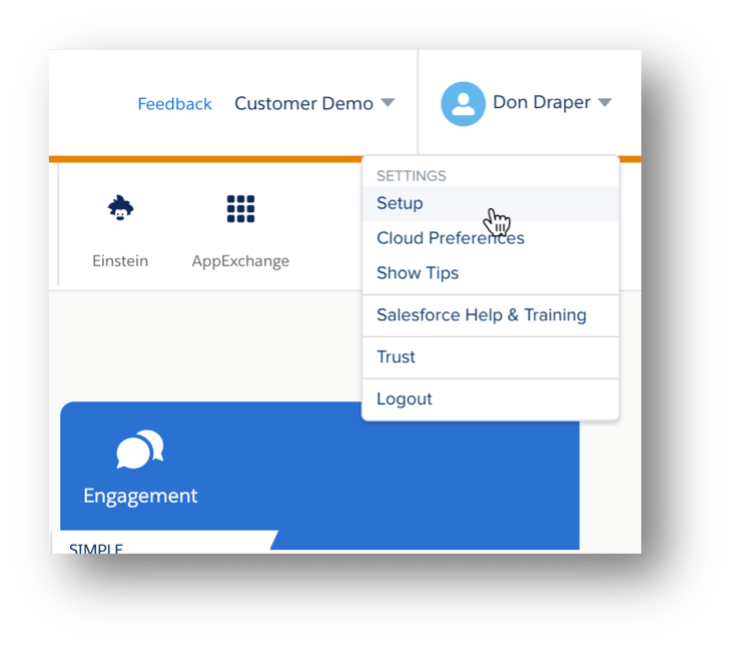
Step 2: Create SFMC Package
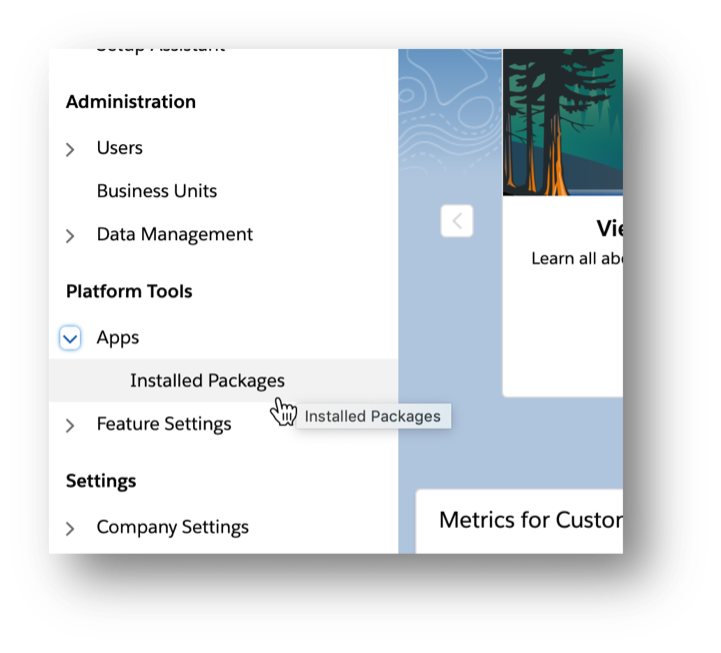
From the settings menu in the upper-right corner, select Setup. In the left-nav bar, expand the Apps menu under Platform Tools and select Installed Packages. If you do not see this option, you may need additional permissions granted on your user account – contact your SFMC admin for support.
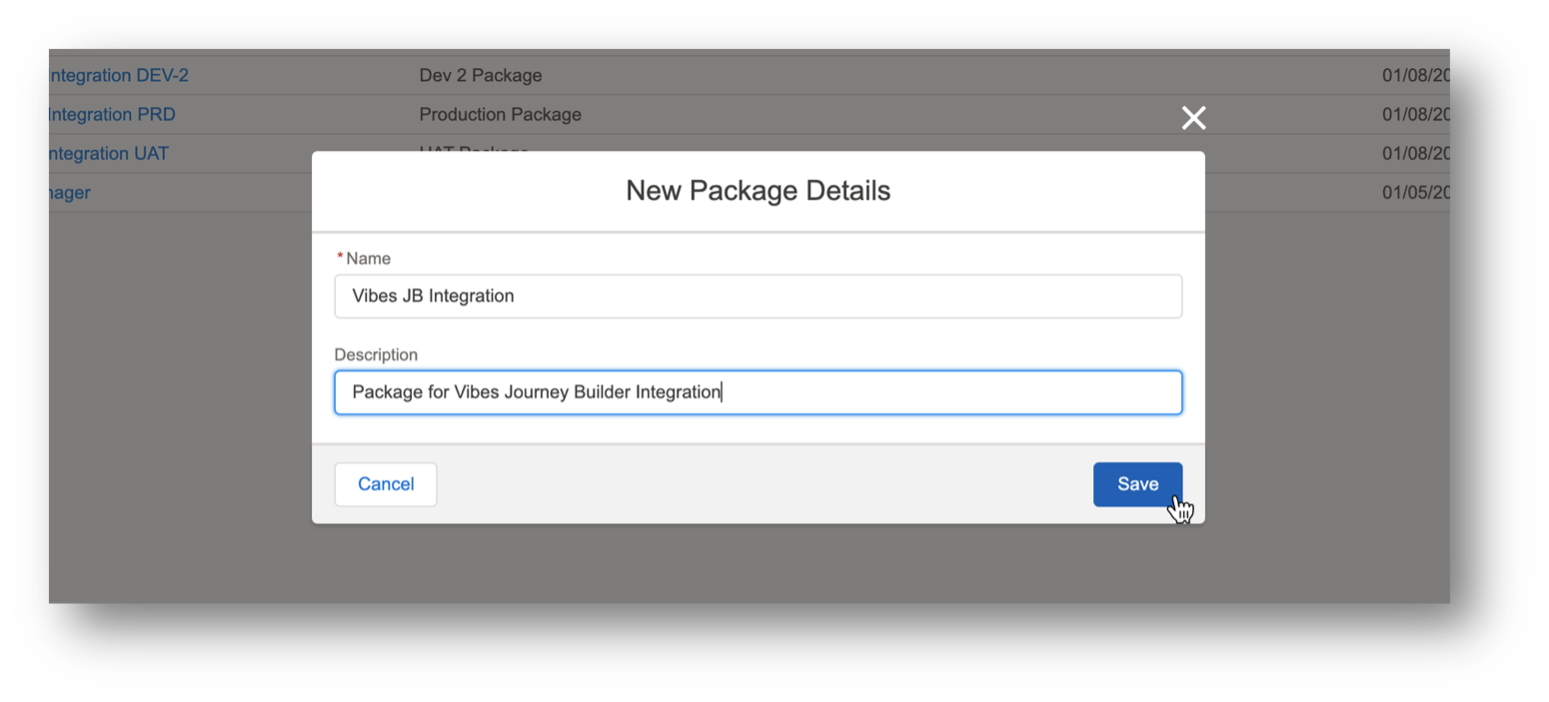
Click the New button in the upper-right corner to create a new package. Enter a Name and Description and click Save.
Step 3: Create API Integration Component
Click Add Component, select API Integration and click Next.
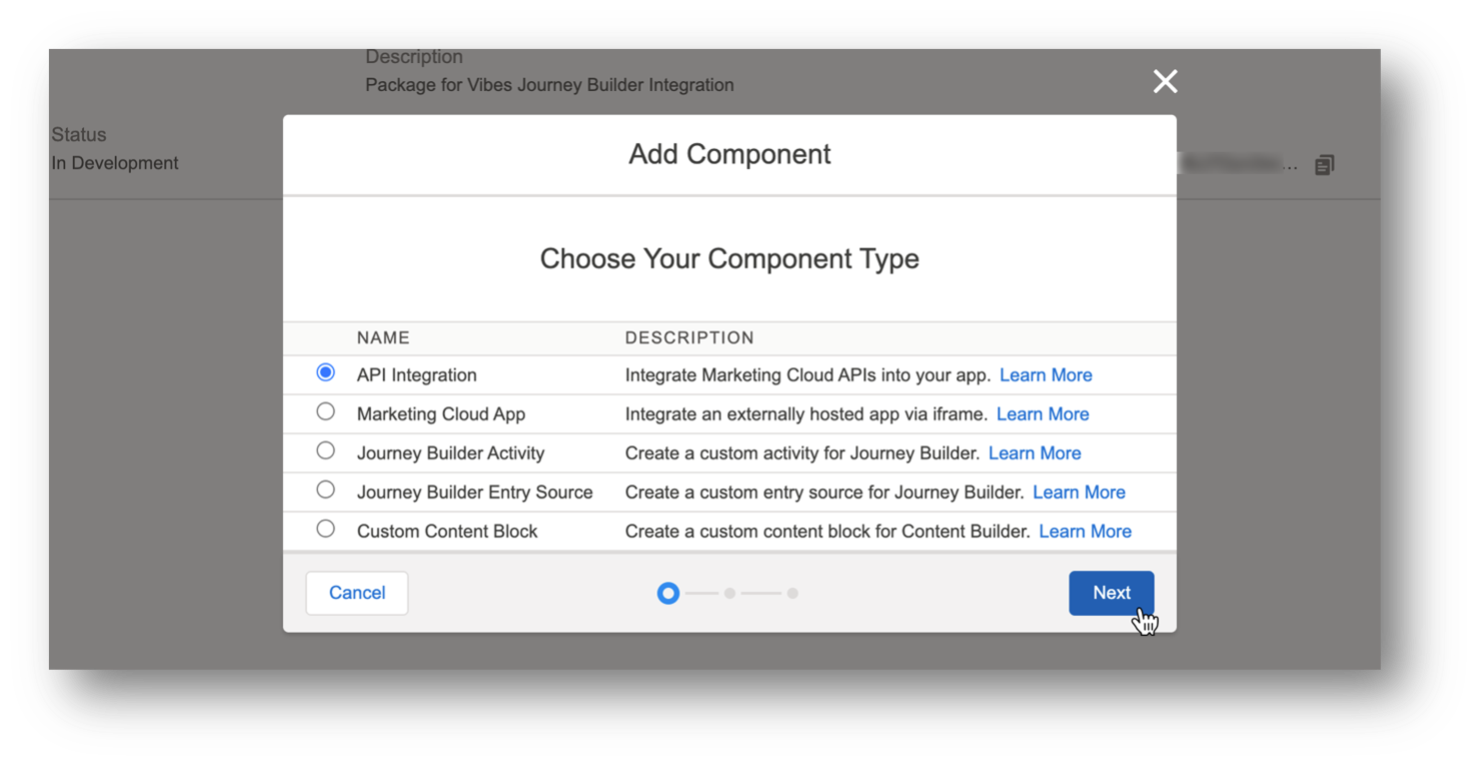
Select Server-to-Server and click Next.

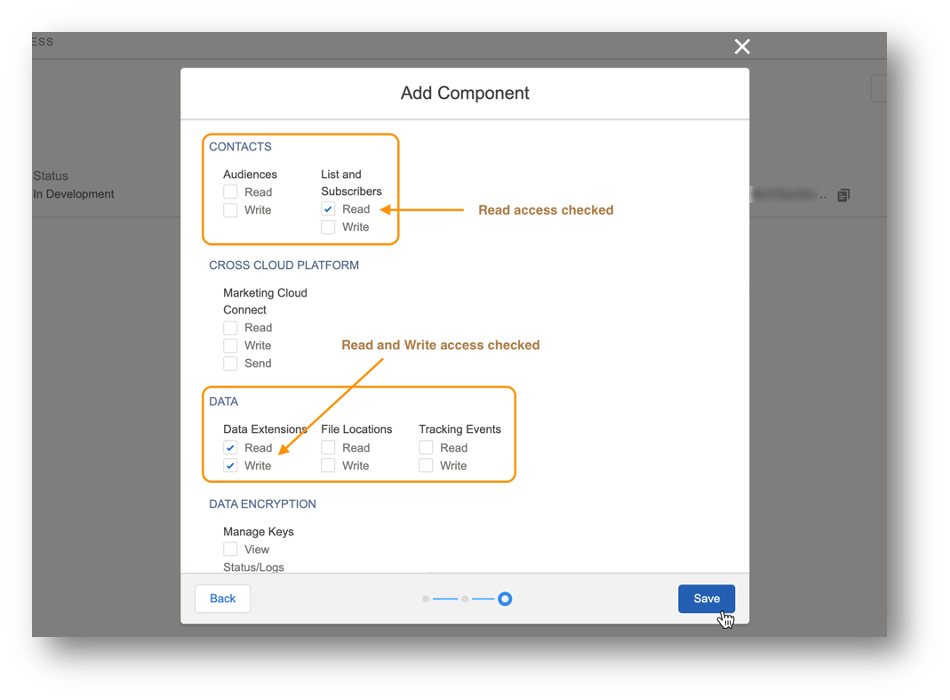
Scroll down to the CONTACTS section and check the Read option under List and Subscribers. Continue down to the DATA section and check Read and Write under Data Extensions.
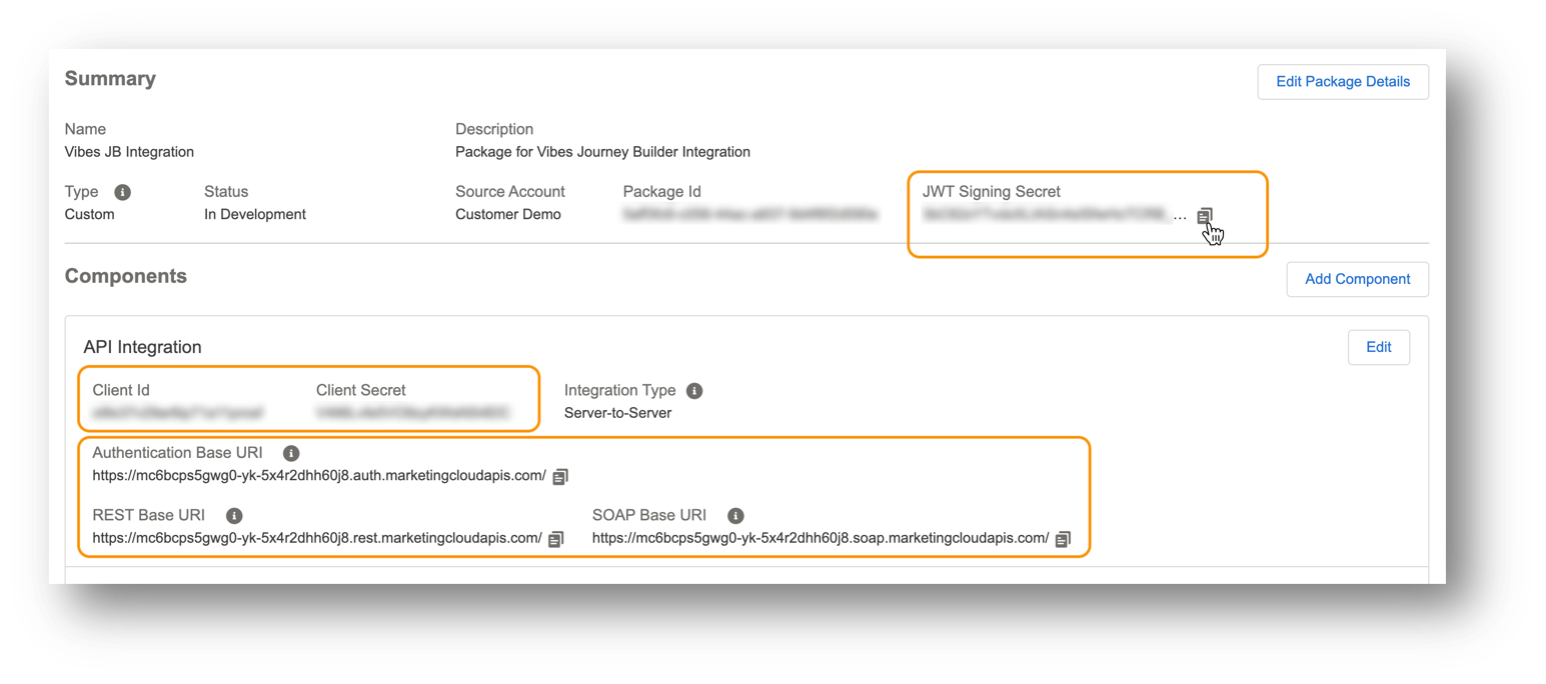
Copy the following values into the SFMC Config file:
- JWT Signing Secret
- Authentication Base URI
- Client Id
- REST Base URI
- Client Secret
- SOAP Base URI
Step 4: Create Journey Builder Activity Component
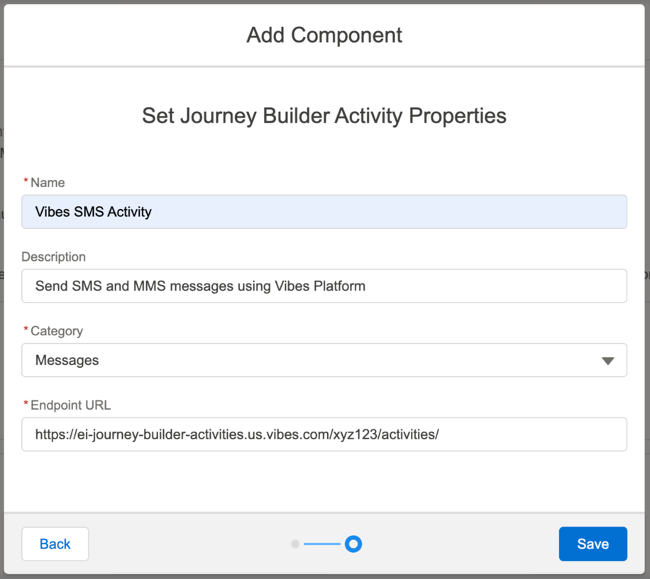
Click Add Component, select Journey Builder Activity and click Next.

Enter a Name and Description, select Category of Messages. Copy the Endpoint URL provided in the SFMC Config file and paste it into the Endpoint URL field. Click Save.
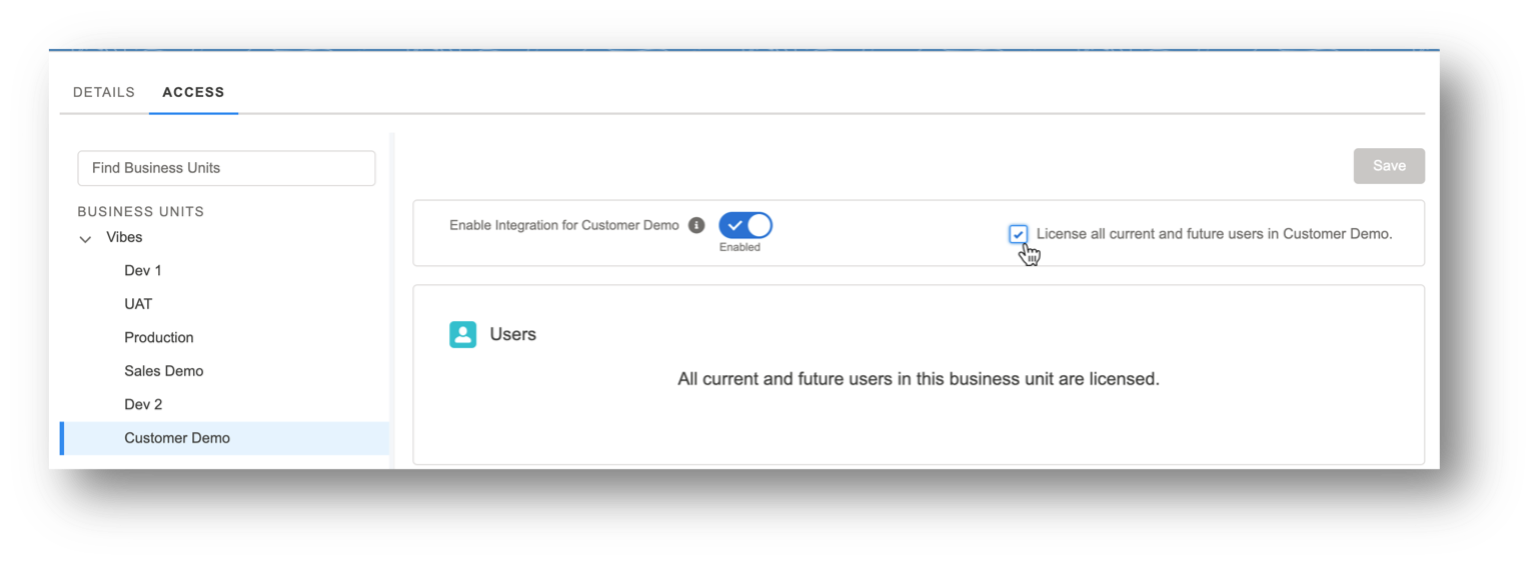
Step 5: Update Package Permissions
Click the ACCESS tab at the top of the package pane and select the Business Unit that you are using. You may enable the integration for all users within the Business Unit or select specific users who you wish to grant access. Click Save to save your changes.
Step 6: Install the integration with Package Manager
The Vibes SFMC integration uses SFMC Data Extensions and Automations to synchronize subscriber, messaging, and click-through data. Salesforce provides an application called Package Manager for configuring data extensions and other artifacts.
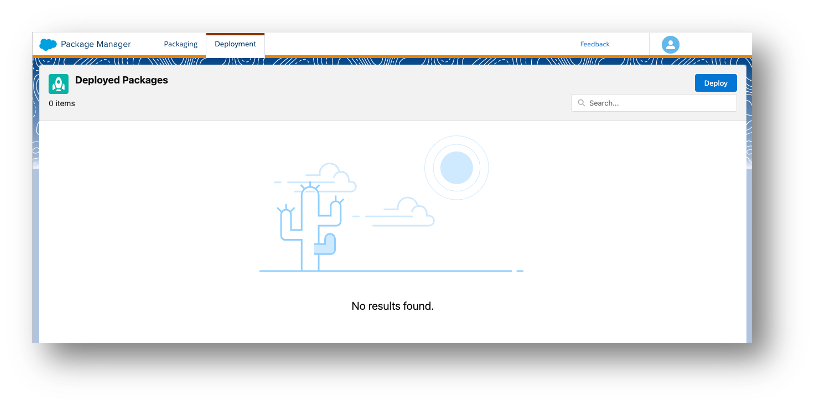
In the main SFMC nav, navigate to Platform › Package Manager. If you don’t see it, contact your SFMC admin for support. Then click on the Deployment tab.
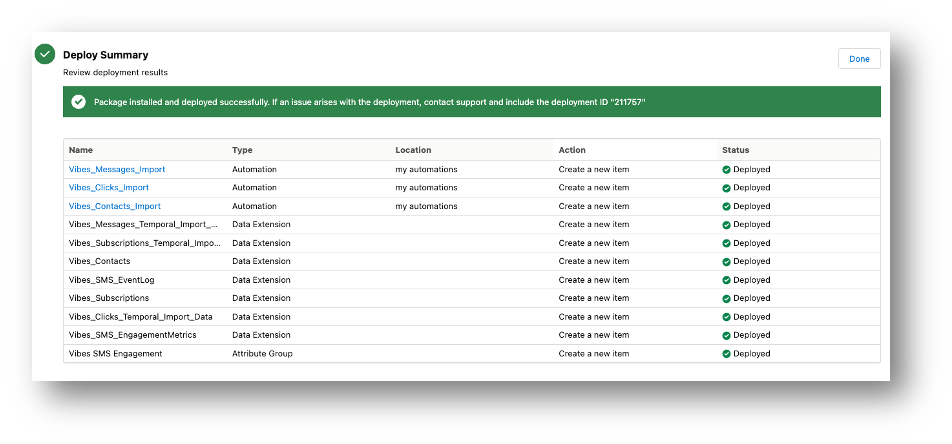
Along with this setup guide, you should have received a Zip file called vibes_sms_activity_20220414_1.zip – drag it onto the drag/drop target. On the Package Customization section select “import” in the File Trigger drop-down and “ExactTarget Enhanced FTP” in the Source FTP drop-down. Then click Next button. Review the info in the Item Validation and Usage section and click Deploy to complete the process. The process should complete within a few seconds, resulting in the following success screen:
After the deployment completes, go to Audience Builder › Contact Builder and select the Data Extensions tab. Then select the Vibes_SMS_EventLog data extension and copy the value EXTERNAL KEY into the SFMC Config file.
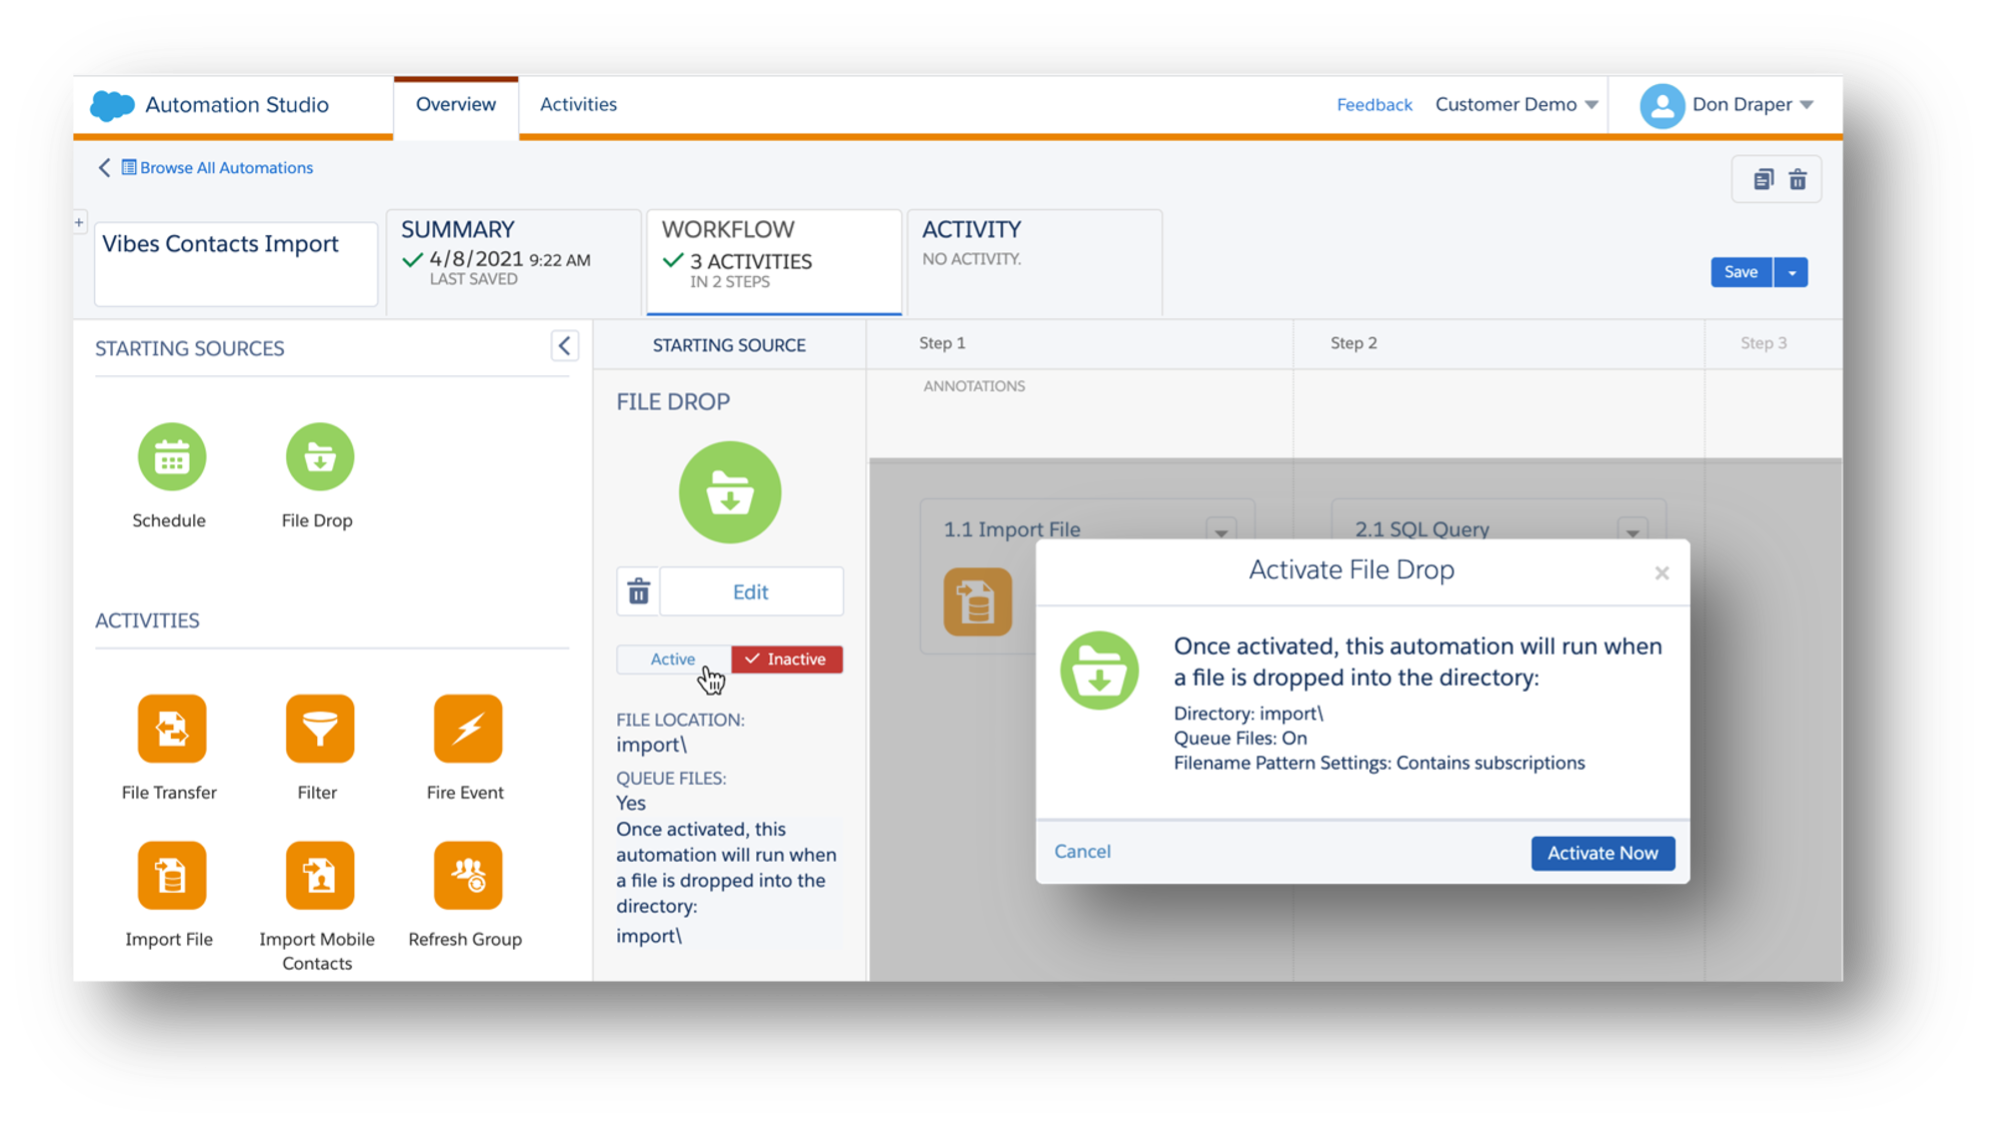
Step 6.a: Activate Automations
An additional step is required to activate the Automations used for importing subscriber, messaging, and click-through data. In the main SFMC nav, navigate to Journey Builder › Automation Studio. In the list of Automations, click on Vibes_Contacts_Import, then select the WORKFLOW tab. In the STARTING SOURCE section, toggle the automation to Active and click the Activate Now button on the confirmation dialog.
Repeat this process to activate the Vibes_Clicks_Import and Vibes_Messages_Import automations as well.
Step 7: Configure FTP Account
The Automation activated in the previous step will be triggered when Vibes’ import files are delivered to your SFMC FTP account. To upload these files, Vibes requires access to an SFMC FTP user account. For increased security and to avoid issues with password resets, Vibes strongly recommends using SSH key-based authentication for the FTP user.
Step 7.a: Add Vibes Public SSH Key
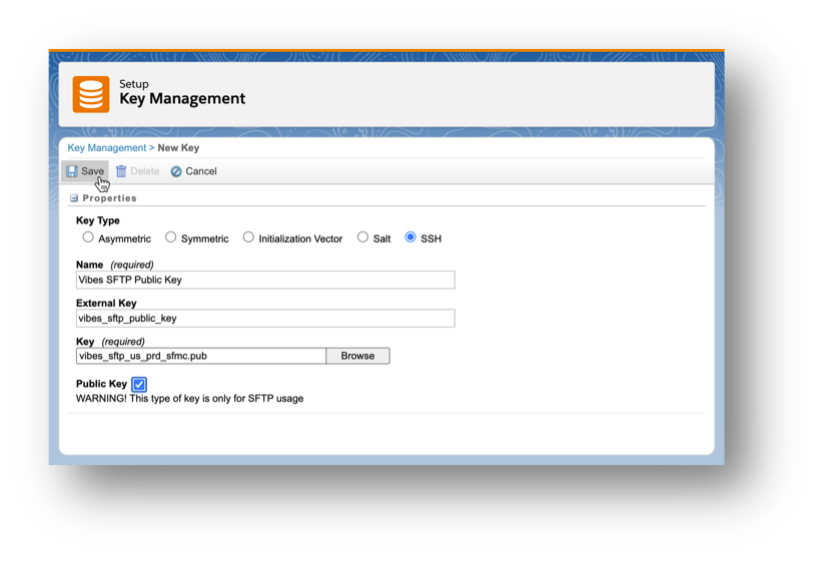
To use SSH key-based authentication, you must first add Vibes Public SSH key to your SFMC account. Navigate to Setup › Data Management › Key Management and click Create. Configure a key with the following attributes:
- Key Type: SSH
- Name: Vibes SFTP Public Key
- External Key: vibes_sftp_public_key
- Key: [ file provided: pub **vibes_sfmc_ftp_public_key.pub **]
- Public Key: checked
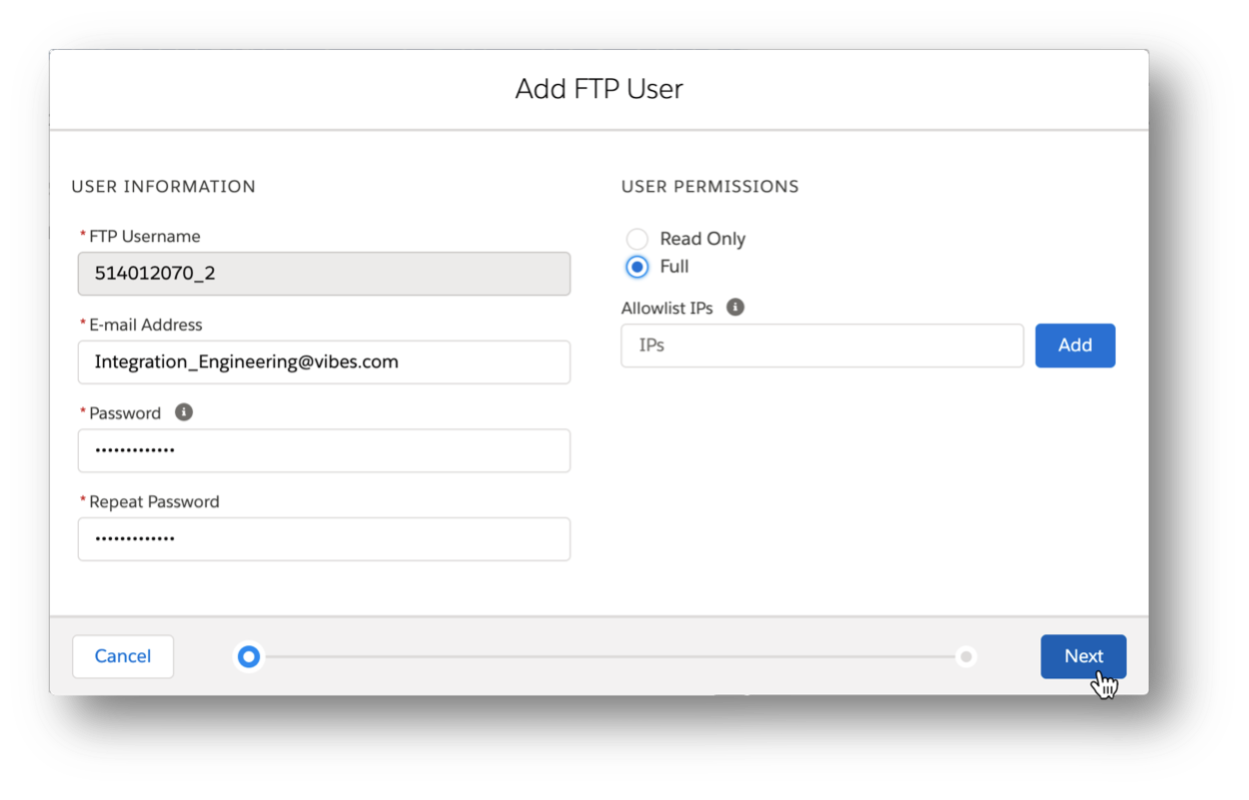
Step 7.b: Add FTP User
Now navigate to Data Management › FTP Accounts and click Add FTP User. Enter the following email address:
For the password, you may enter any value that satisfies the password requirements; you do not need to store this anywhere or share it with Vibes (in the next step, you’ll be configuring the FTP user to use SSH key-based authentication instead of a password). Set the user permission to “Full” and leave the Allowed IPs unchanged. Click Next to continue.
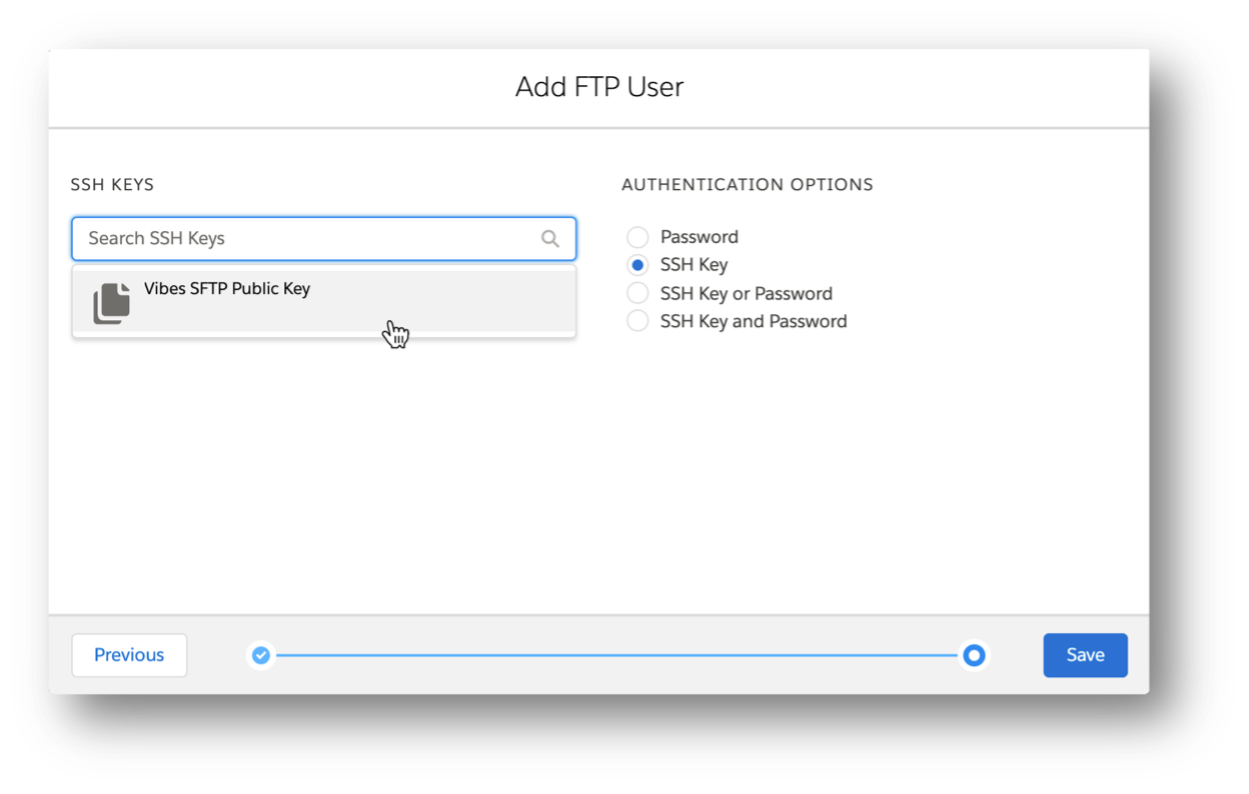
On the next screen, select “Vibes SFTP Public Key,” change the authentication type to “SSH Key” and click Save.
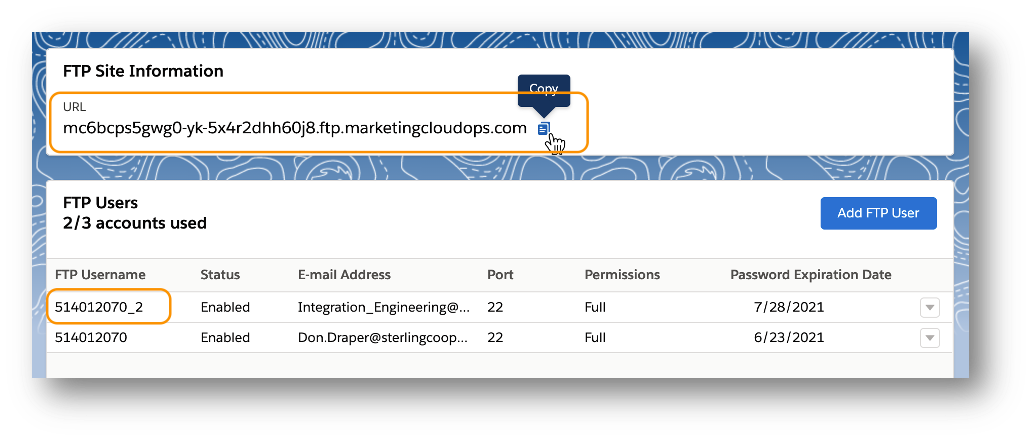
After saving, you will return to the main FTP Accounts page. From here, copy the FTP Site URL and the FTP Username for the new FTP account and paste these values into the SFMC Config.xlsx file.
Step 8: Upload Config file
You have now completed all of the configuration steps. Double check your SFMC Config.xlsx file to confirm that no fields are highlighted (indicating a missing value).
To upload your file, reach our to your account representative for access to our secure file location.
Set up is complete! What’s next?
Once your file is uploaded, our activation team will review the config file. Assuming everything looks as expected, we will configure your integration instance and activate your data extracts (up to 5 business day turn-around). Once complete, your Vibes mobile subscribers, messaging and click-through data will begin syncing into your SFMC account, and you will be able to create and use Vibes SMS Activities within Journey Builder.
In the meantime, you can sync your contacts using our contact-linking guide or learn about multi-tenancy scenarios.
Contact Linking
Once your Vibes SFMC integration setup is complete, your Vibes mobile subscription and engagement data will begin syncing daily into your SFMC instance, and you can begin using the Vibes SMS/MMS Activity in your SFMC Journeys.
However, to get the full benefit out of the integration, you will want to “connect the dots” between your SFMC Contacts and Vibes Mobile Subscribers, which will give you full access to your contacts.
Unfortunately, there's no one-size-fits-all for this process. SFMC setup can vary from company to company. Customers use different values for their SFMC ContactKey and take different approaches to matching a subscriber’s identity across channels. For this reason, we do not provide a standard, automated approach to contact linking. This guide provides an example, reference implementation of how to establish this linking.
The example below covers the scenario where the value of the SFMC ContactKey is identical to the value being set for the Vibes Platform external_person_id. If your setup matches this, you should be able to follow the process below with little to no changes. If your approach to cross-channel identify matching differs from this, your approach to linking the data will vary.
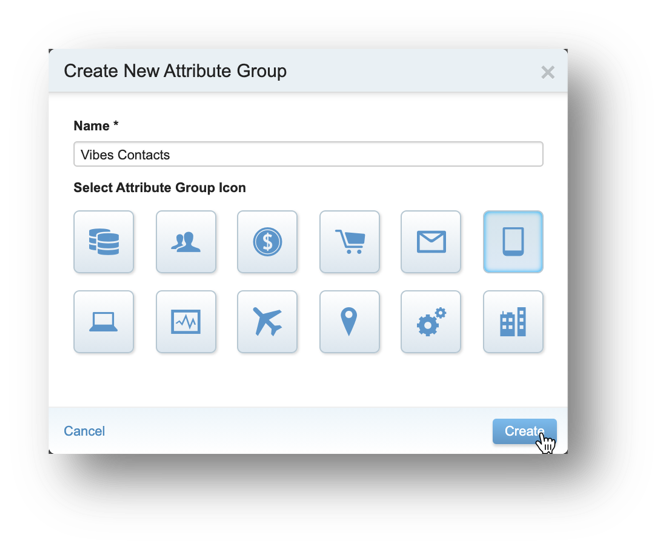
Step 1: Link Vibes_Contacts
Login to SFMC, switch to the correct Business Unit and navigate to Audience Builder › Contact Builder. Click the Create Attribute Group button in the upper-left corner. Name the group “Vibes Contacts”, select your preferred icon and click Create.
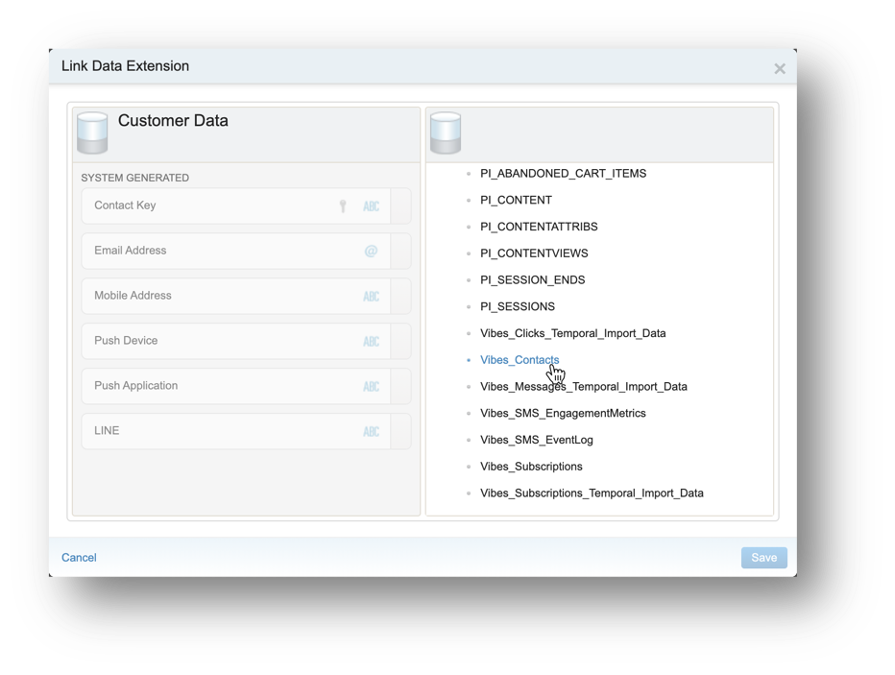
Expand the Data Extensions folder in the right-hand pane and select Vibes_Contacts. Select Contact Key in the left (Customer Data) pane and ExternalPersonID in the right (Vibes_Contacts) pane.
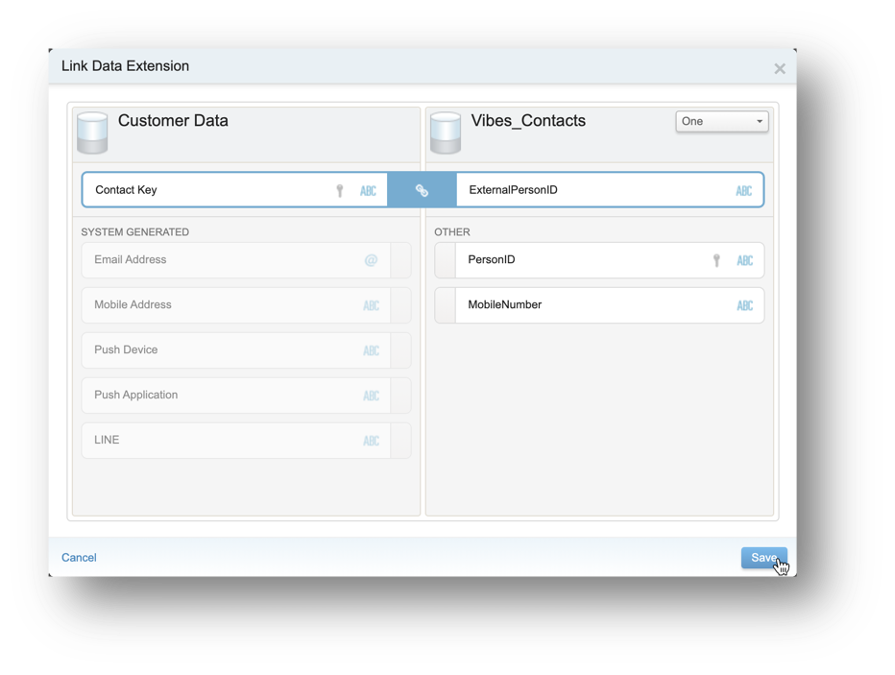
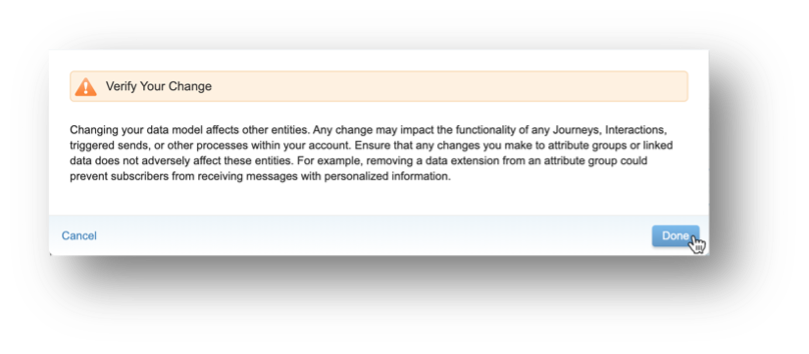
Click Save and then Done on the confirmation dialog. You should see a relationship diagram like the one shown in step 2 below.
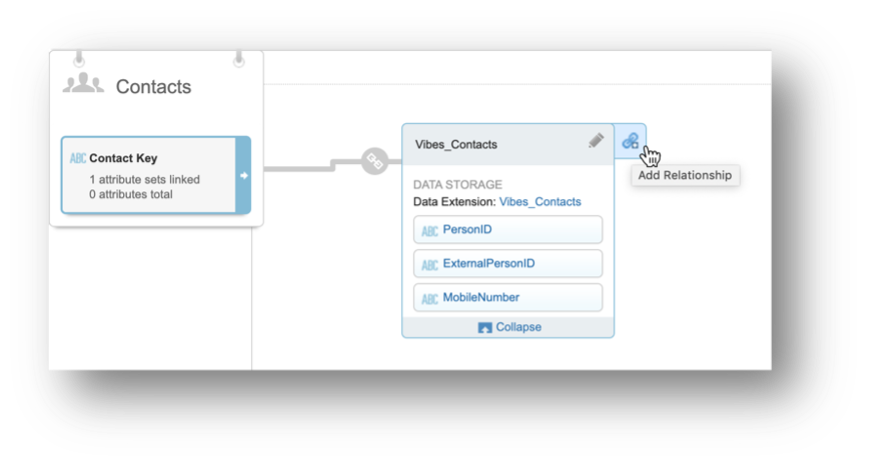
Step 2: Link Vibes_Subscriptions
The next step is to link the Vibes_Subscriptions Data Extension. Begin by clicking the Add Relationship icon at the right edge of the Vibes_Contacts entity.
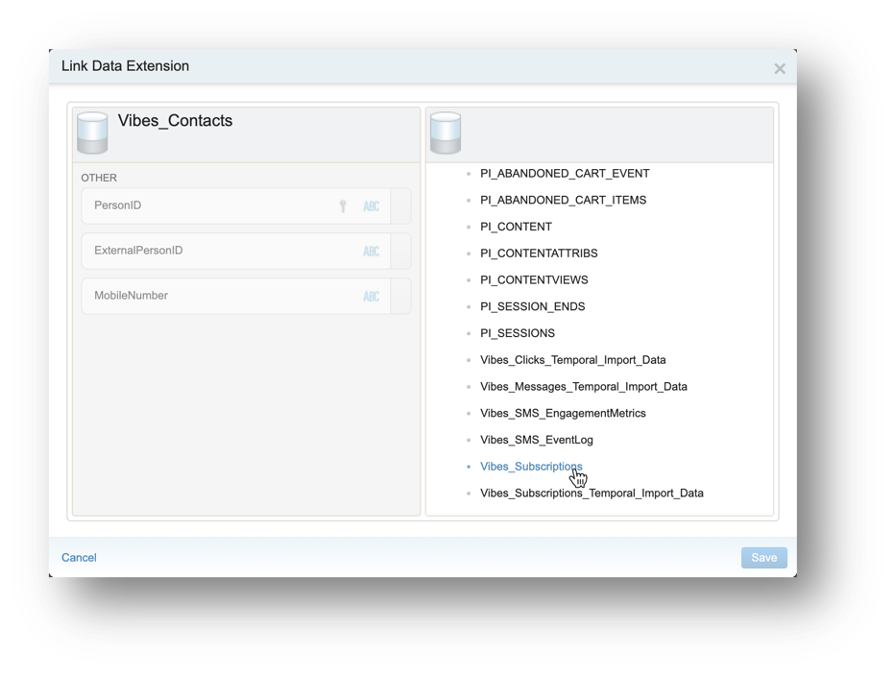
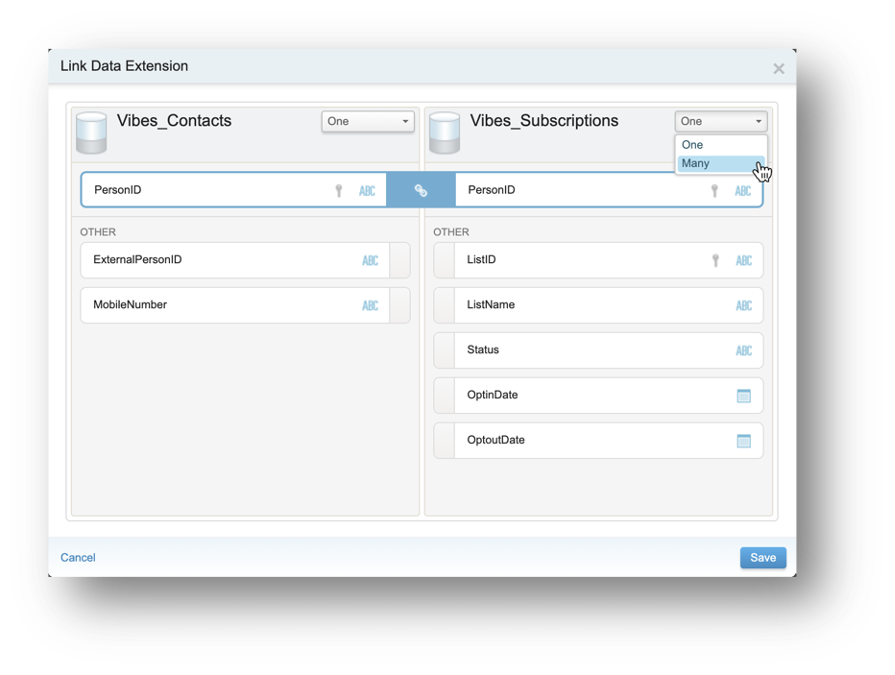
Expand the Data Extensions folder in the right-hand pane and select Vibes_Subscriptions. Select PersonID in both the left (Vibes Contacts) and right (Vibes_Subscriptions) panes. In the upper-right corner of the dialog, change the relationship type to Many.
ImportantDon’t forget to change the relationship type to “Many”.
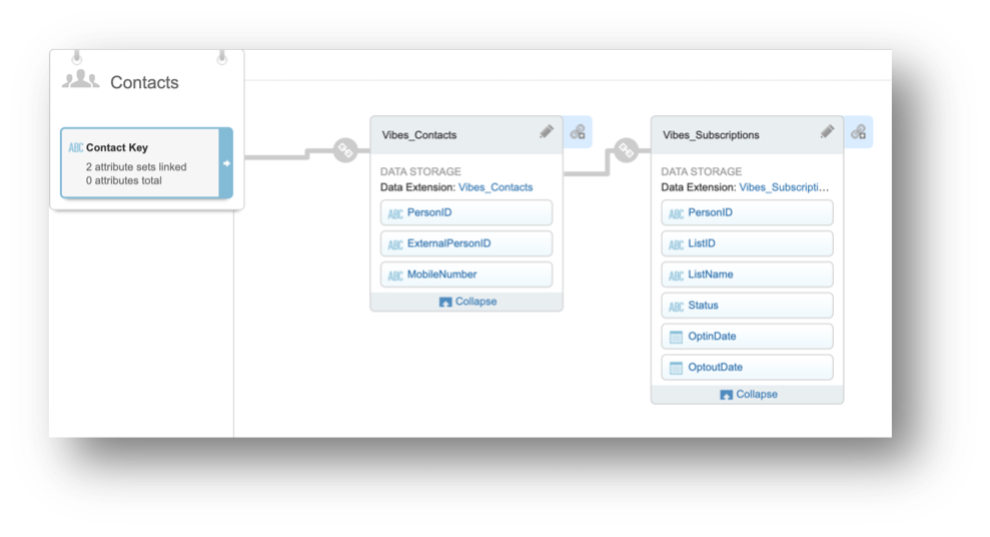
Click Save and then Done on the confirmation dialog. You should see a relationship diagram like the one to the right.
Conclusion
If your setup matches this reference implementation and you followed the steps above, congratulations! You’ve now linked your SFMC Contacts and Vibes Mobile Subscribers and can enjoy the full benefits of including Vibes SMS/MMS Activities in multi-channel journeys.
If your setup differs from this, we encourage you to work with an SFMC SI partner and other appropriate SFMC resources to identify the approach that works best for your SFMC configuration. Your Vibes Mobile Engagement Services team member can provide guidance and assistance in this process as well.
Adding Vibes Message Activity to Your Journey
By utilizing the Vibes SFMC Integration, you can create a cross-channel identity link that will allow you to craft a full multi-channel personalized mobile engagement experience for your customers using Vibes functionality within SF Journey Builder.
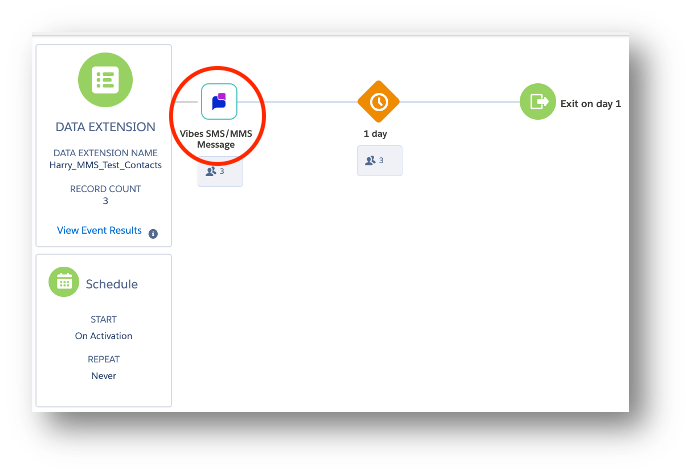
Upon activating the Vibes SFMC Journey Builder integration, you should now see the Vibes SMS/MMS Message Activity (with the Vibes custom icon) under available activities in Journey Builder. You can add this message activity to a journey to utilize Vibes subscriber and click engagement data within a journey sending an SMS or MMS message.
Follow the below steps to create a new Journey in SFMC using the Vibes Activity.
Note: Your Vibes contacts are not subject matter experts with Salesforce's Journey builder. Guidance discussed in this document pertains to utilizing data extensions and Vibes SMS activity. For questions on SFMC Journey Builder functionality, please reach out to your designated SF account rep.
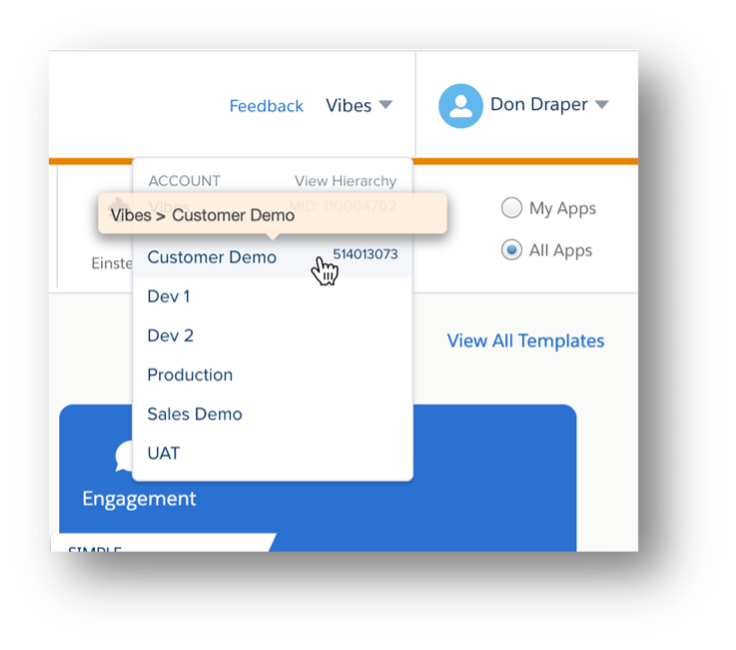
Step 1: Login and Switch Account
Log into SFMC and switch to the account that is configured with the Vibes integration.
Step 2: Create a New Journey
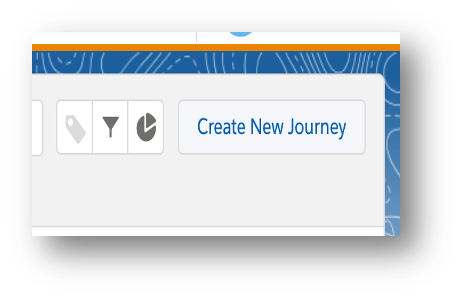
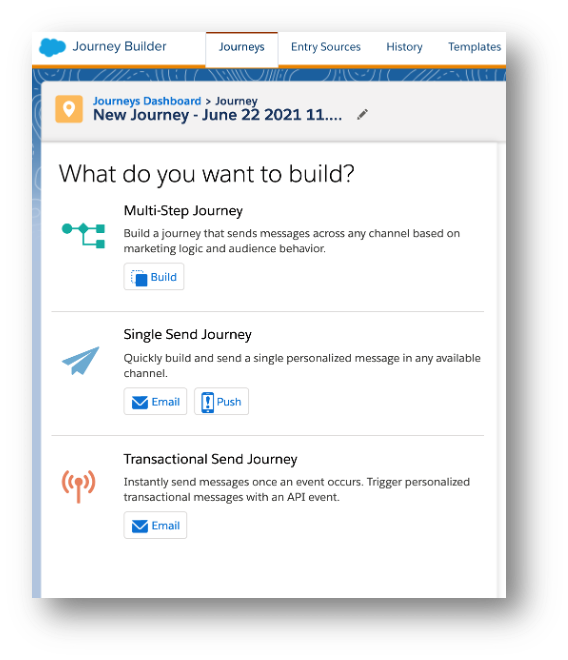
- From the top navigation banner select the Journey Builder In the upper-right corner, select an existing journey or Create New Journey.
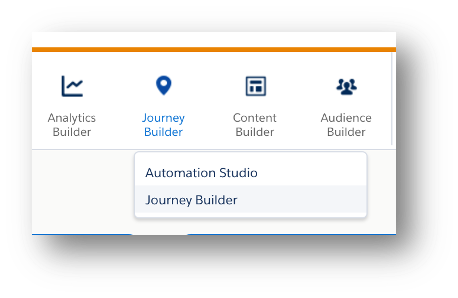
- Click the Multi-Step Journey option from the left had journey builder bar. The Vibes activity is only available in the Multi-Step Journey build option. The Single Send Journey and Transactional Journey builds are not integrated with the Vibes SMS activity.
Step 3: Setup the Journey Entry Source
Setup the Journey Entry Source as you would with any journey. If you need help figuring out how to start the Journey or select the entry source reach out to your SF rep.
Step 4: Add the Vibes Message Activity within the Journey
The Vibes activity is designed to send personalized and targeted messages using personalization tags setup within SF and Vibes liquid tags. You can track unique click engagement using the Vibes URL shortener functionality which will be synced back into the Vibes data extension within SF when a consumer interacts with the message.
- Navigate to the Activities section > messages and drag the Vibes SMS/MMS Message icon into the Journey. The Vibes icon will have a grey background fill until the Activity is setup and saved within the Journey.
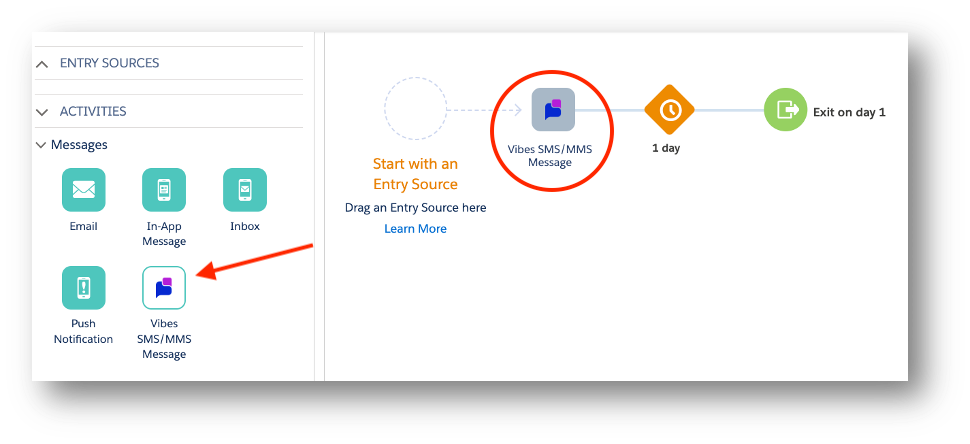
Step 5: Configure the Vibes SMS Message Campaign
SMS Setup Steps
- Click the Vibes SMS/MMS Message activity in the journey to configure your message
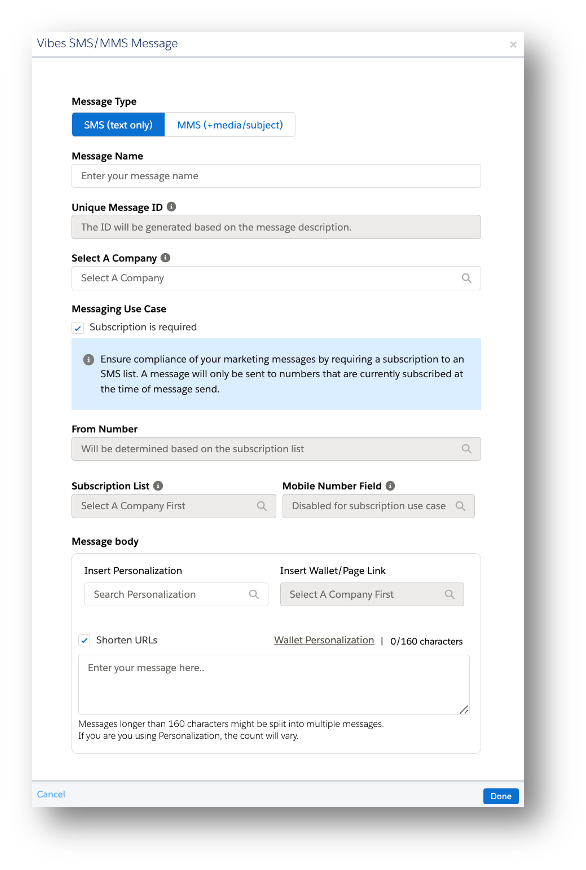
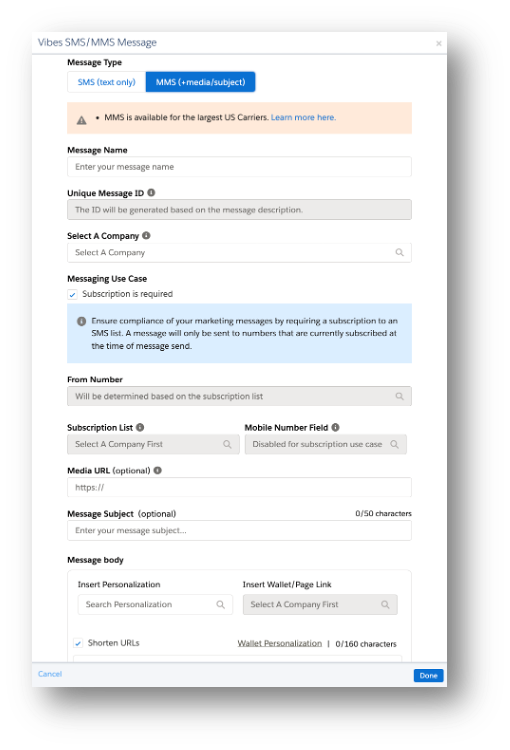
- Select the SMS (text only) Message Type
- Enter a Message Name
- Enter a Unique Message ID
- The Unique Message ID will auto generate to match the Message Name. The ID can be overridden; however, it must be unique as it is the identifier used to track the activity instance by Vibes and Salesforce. Once saved, you cannot change the Unique ID.
- Select a Company for the Journey
- The company selected will be used as the origin on the message and in turn the corresponding short domain/vanity url if setup with Vibes. During the integration setup phase you have the ability to link multiple Vibes accounts to a single business unit in SF.
- Select the Messaging Use Case for the journey
- *Please refer to our Use Cases Appendix for in depth details on incorporating Vibes use cases within a Journey.
- There are two message Use Case options: Non-Subscription or Subscription. This is controlled by the Subscription Is Required checkbox which is defaulted to checked. If remained checked, the campaign will utilize Vibe’s customer subscriber data. The info box copy changes as soon as the checkbox is checked or unchecked. Certain inputs are only accessible and required per use case.
- If selecting subscription is required, the From Number is automatically determined based on the subscription list selected


| Use Case | FROM NUMBER | SUBSCRIPTION LIST | MOBILE NUMBER |
|---|---|---|---|
| Subscription Required | Disabled | Active | Disabled |
| Subscription Not Required | Active | Disabled | Active |
- Enter the From Number to select the short/long code (Non-Subscription Only)
- Displays all codes configured in your Vibes account
- The mobile number from the linked Vibes Contact record is used and will be automatically determined IF the Subscription List is selected
- Select the Subscription List from Vibes to identify the subscriber audience (Vibes Subscription Only)
- Drop down will show all available lists setup in Vibes account associated with SF BU
- Select Mobile Number Field from entry source within SF (Non-Subscription Only)
- The mobile number used is required in E.164 format
- Numbers must be formatted in the country associated with short code selected in Step 5
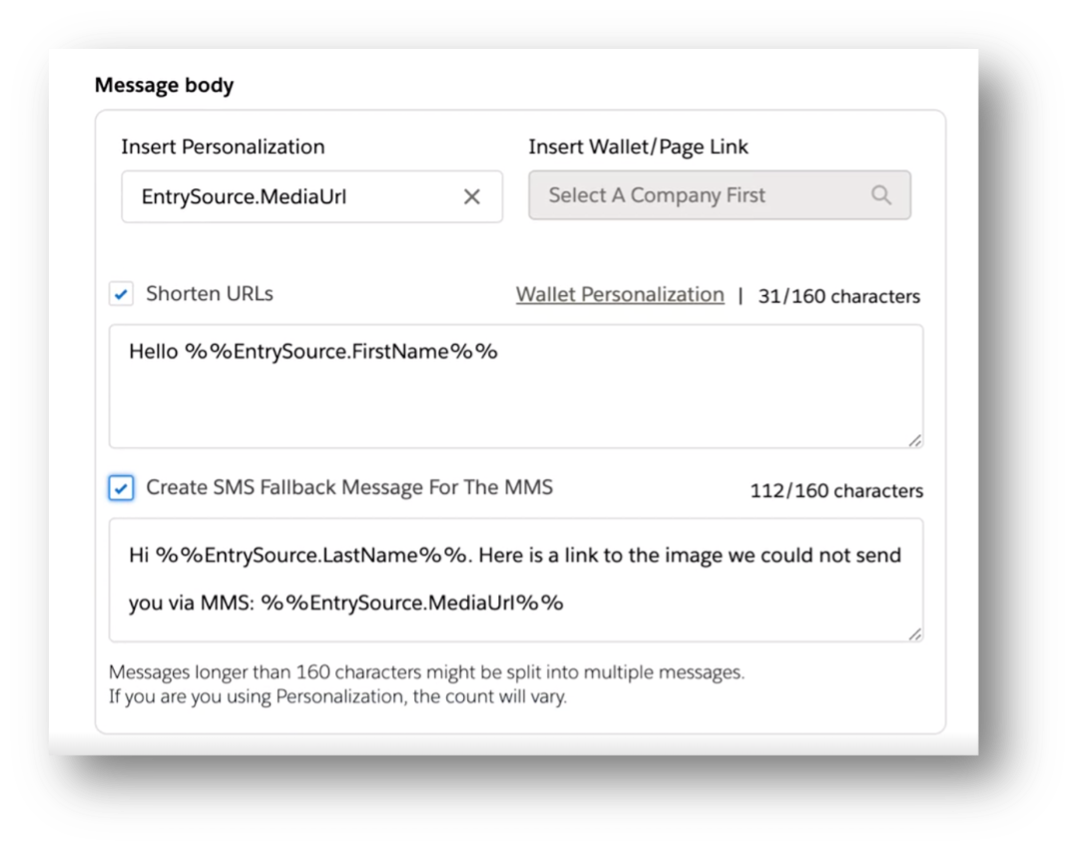
- Fill out the Message Body section to compose the SMS message
- Insert Personalization from dropdown (Optional)
- The message can include any personalization tag setup in SF by referencing the fields from entry source, data extension or other data extension that are linked via an Attribute Group. For example, if you have a field called customer_name, you could use the value from that field in your message and it will display %%customer_name%%.
- Note: You cannot manually paste in a tag from SF. It must be selected within this field view.
- Insert Mobile Wallet from dropdown (Optional)
- The message can include any mobile wallet campaign associated with the account selected. You can insert the wallet SmartLink and then append dynamic content for personalization from SF or the Vibes platform. See table below for details.
- Select to use the Shorten URLs option
- When enabled, this option converts HTTP/HTTPS URLs in your SMS messages to unique, shortened URLs for your recipients. The shortened URLs reduce the total number of characters that links consume and produce click tracking metrics, helping you determine how effective your SMS messages are in driving traffic to your links.
- If you have a custom short domain enabled in your Vibes account, the shortened link will use this short domain.
- Enter the Message Content
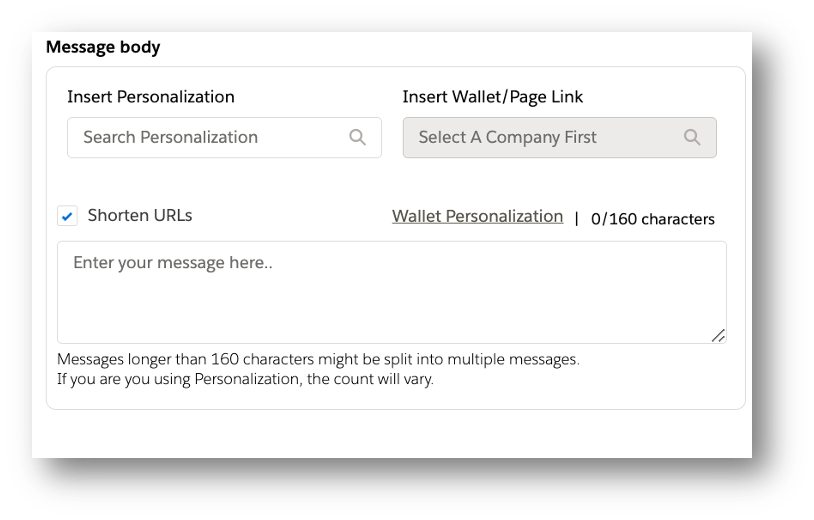
- Include SF personalization tags and personalized wallet links by selecting the field in the personalization search bars. Do not write in or modify the AMPScrypt Syntax.
- Include Vibes liquid tags, such as mobile wallet SmartLinks, by manually entering them into the text box.
Creating personalization tags
Open the Vibes platform and create the personalization tags within the message editor. If the data needed is stored in Vibes for the wallet pass use the Vibes Tag. Data from another source, use full SmartLink.
| Vibes Tags | Format | Note |
|---|---|---|
| Vibes Mobile Wallet Tag | {{ cm.wallet | token: "xydhs"}} Or | The Vibes wallet tag will send a secure SmartLink. You can append data directly from SF into the wallet campaign by inserting the full wallet SmartLink and data element parameters. You will need to use the %% and field name. See SmartLink Configuration Sample Full Link with SF data tags: |
| Incentive Code Pool | { incentive_code | pool_id: X }} | Vibes platform will be able to distribute unique offer code by pool id. |
| Custom Field | {{ field_name | default: "value"}} | |
| Vibes Ecomm Tags | {{ tag_tracking | url: "link “}} | Requires setup of Vibes ecommerce tags with tag management platform. See documentation on Vibes Ecommerce Tag solution |
- Review Character Count
- Countdown is set to 160 characters and should be used as a guide due to SF character tracking limitation.
- Click Done when finished
- Save the Journey in SF
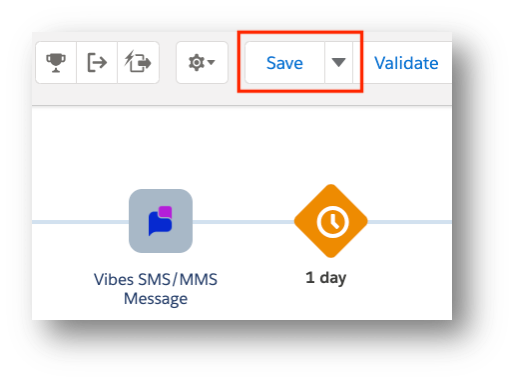
Once the Vibes activity and journey is saved and executed, the Vibes SMS/MMS message icon will turn white, and a Vibes event trigger API campaign will be automatically setup within the Vibes Platform Customer Account.
Don't forget to saveFailure to save a journey in SF after clicking done in the Vibes activity will cause Vibes and SF to become out of sync.
All journey edits must occur ONLY in SFMC Vibes Message Activity. If you edit the event trigger campaign in the Vibes platform, then you will break the connection between Vibes and SF. You can edit the activity message in SF, and it will modify in Vibes automatically.
MMS Setup Steps
The Vibes SMS activity can be configured to deliver an MMS message in a Journey. Depending on the intended customer experience, you may choose to use an MMS message type as the primary communication channel and an SMS message as a fallback for unsupported carriers. The Vibes activity will give you the option to setup an SMS fallback experience. It is not required but highly recommended so you capture the full target audience.
Below are the steps to configuring a journey using the Vibes MMS Message Type.
-
In Salesforce Marketing Cloud, go to Journey Builder » Journey Builder
-
Select an existing journey or click Create New Journey
-
Go to Activities » Messages and drag the Vibes icon into your journey
-
Click the Vibes SMS/MMS Message activity in the journey to configure your message
-
Select the MMS (+media/subject) Message Type
-
Enter a Message Name
-
Enter a Unique Message ID
-
Select a Company for the Journey
-
Select the Messaging Use Case for the journey
- *Please refer to Appendix for in depth details on incorporating Vibes use cases within a Journey.
-
Enter the From Number to select the short/long code (Non-Subscription Only)
-
Select the Subscription List from Vibes to identify the subscriber audience (Vibes Subscription Only)
- Drop down will show all available lists setup in Vibes account associated with SF BU
-
Select Mobile Number Field from entry source within SF (Non-Subscription Only)
- The mobile number used is required in E.164 format
-
Determine whether you are sending a Dynamic MMS or Static MMS to the target audience
-
Option 1: Enter a static Media URL link (with the http:// or https://) to the media to be included in the MMS.
- Supported media types: .jpeg, .png, and .gif
- Max file size: 500KB
- The URL must be publicly hosted and available at the time of the MMS send
- Note: Using this option will send the same image to the full target audience
ii. Option 2: Enter a Dynamic Media URL link using the proper Vibes liquid tag {{ ev.media_url }}. See table for more details.
- Include a default within the tag to ensure every consumer will receive an image
- Supported media types: .jpeg, .png, and .gif
- Max file size: 500KB
- MediaURL max length is 500 characters
- The URLs must be publicly hosted and available at the time of the MMS send
- Note: The data extension containing the target audience will require a separate column labeled “MediaURL” to assign the specific url to a mobile number. The column header is case sensitive. The column length should be at least 500 characters as the URL will be longer than the other variables.
Vibes Tags Format Note Dynamic MMS URLs {{ ev.media_url \| default: “https.vibes.com” }}Requires media URL to exist in the data entry source extension. If the media URL is not assigned to a mobile number in the extension, Vibes will send the default URL included in the tag.
You can use ‘’ or “” quotes when entering the url.
-
-
Enter a Message Subject
- The Message Subject field is optional. If entered it will appear as a subject line above the image in the text message
-
Fill out the Message Body section to compose the MMS message
- Insert Personalization from dropdown (Optional)
- The message can include any personalization tag setup in SF by referencing the fields from entry source, data extension or other data extension that are linked via an Attribute Group. For example, if you have a field called customer_name, you could use the value from that field in your message and it will display %%customer_name%%.
- Note: You cannot manually paste in a tag from SF, it must be selected within this field view.
- Insert Mobile Wallet from dropdown (Optional)
- The message can include any mobile wallet campaign associated with the account selected. You can insert the wallet SmartLink and then append dynamic content for personalization from SF or the Vibes platform.
- Select to use the Shorten URLs option
- Note: When enabled it converts HTTP/HTTPS URLs in your SMS messages to unique, shortened URLs for your recipients. The shortened URLs reduce the total number of characters that links consume and produce click tracking metrics, helping you determine how effective your SMS messages are in driving traffic to your links.
- If building a URL with personalization from SF attribute appended as a parameter, the Vibes URL shortener will shorten the URL and track consumer engagement.
- Will use the vanity URL from Vibes account selected in Company.
- Enter the Message Content
- If inserting a wallet pass or SF personalization data, it will appear within the message window.
- Include any copy or links

- Review Character Count
- Countdown is set to 160 characters however MMS supports greater than 160 characters
- Check the Create SMS Fallback Message checkbox to setup the automatic SMS Fallback experience for consumers on devices (Optional)
- Due to carrier limitations, some of your end users may not be able to receive MMS messages. In those cases, you can set up an SMS message to be sent to those users.
- Start by selecting the checkbox. A second text box will appear for your SMS message.
- Message copy from MMS will carry over into the SMS message body. You can update as needed.
- Insert Wallet and Personalization Tags.
- Countdown is set to 160 characters. Note that messages longer than 160 characters may be split into multiple messages.
 Using tags
Insert personalization and wallet data tags are available with the SMS fallback message editor. They can be different from the MMS setup.
SMS Fallback will have its own event in Vibes for tracking between SMS and MMS
- Click Done when finished
- Insert Personalization from dropdown (Optional)
Don't forget to saveFailure to save a journey in SF after clicking done in the Vibes activity will cause Vibes and SF to become out of sync.
All journey edits must occur only in SFMC Vibes Message Activity. If you edit the event trigger campaign in the Vibes platform, then you will break the connection between Vibes and SF. You can edit the activity message in SF and it will modify in Vibes automatically.
Please note that your Vibes contacts are not subject matter experts with Salesforce's Journey builder. Guidance discussed in this document pertains to utilizing data extensions and Vibes SMS activity. For questions on SFMC Journey Builder functionality, please reach out to your designated SF account rep.